User Manual for Skills Menu
Login
To Login to the PINTAR website, do the following:
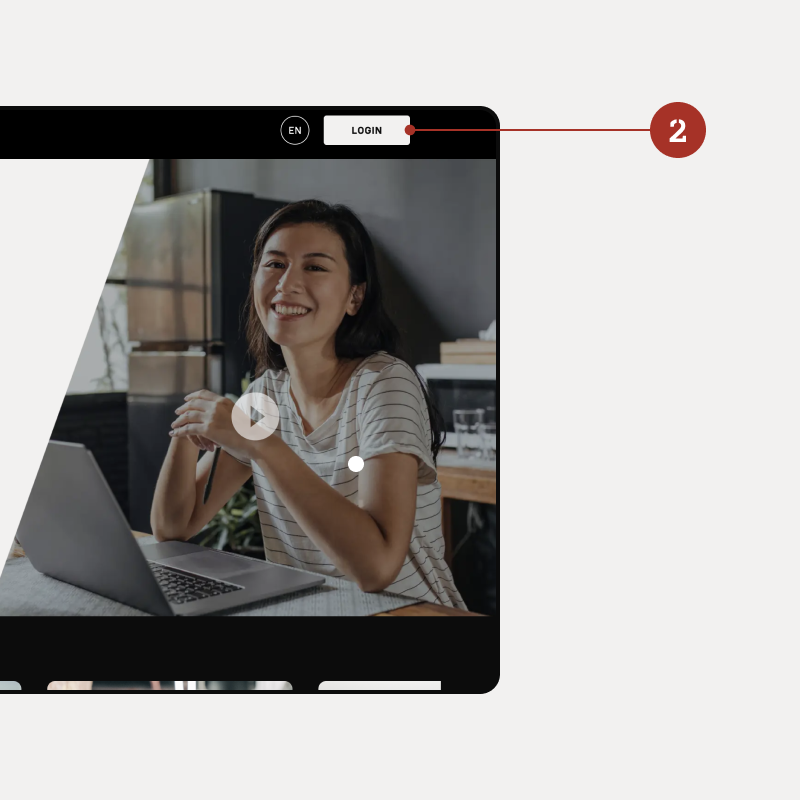
- Enter the URL (https://skills.pintar.co/id).
- Click the Login button on the navbar.
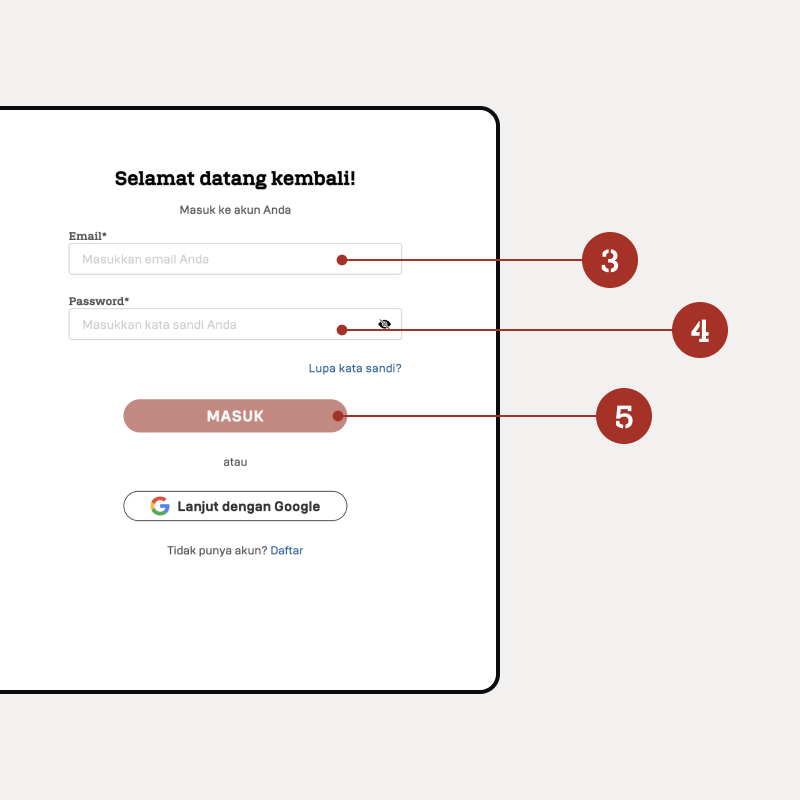
- Enter your email in the Email column.
- Enter your password in the Password column.
- Click the Login button.
Entering PINTAR Skills
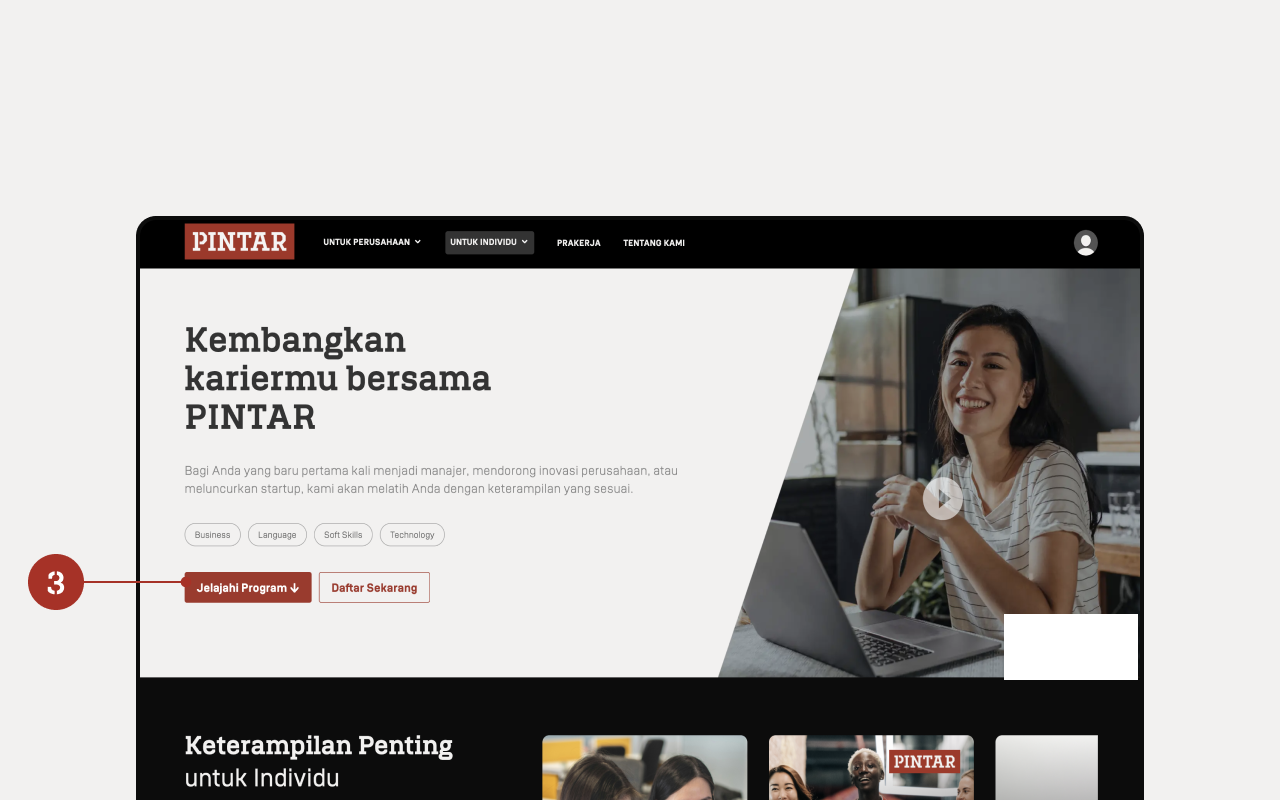
- Click the "For Individuals" dropdown menu to display the skills menu.
- Click the "PINTAR Skills" menu
- Click "Explore Programs" to see the various skills options available.
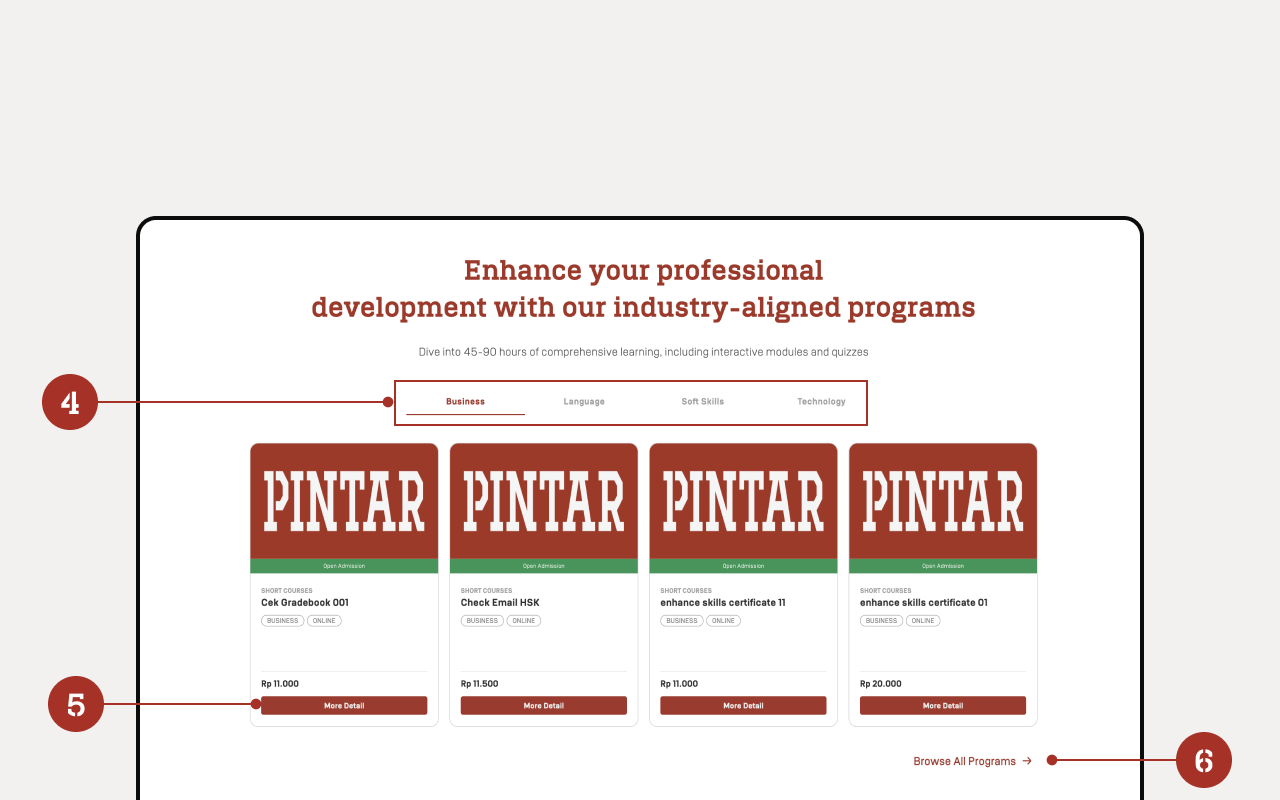
- There are several categories of Skills that can be selected according to interests and needs.
- Click the "More Detail" button if you want to buy the Skill.
- If you want to see all the available skill programs, you can click "Browse All Programs".
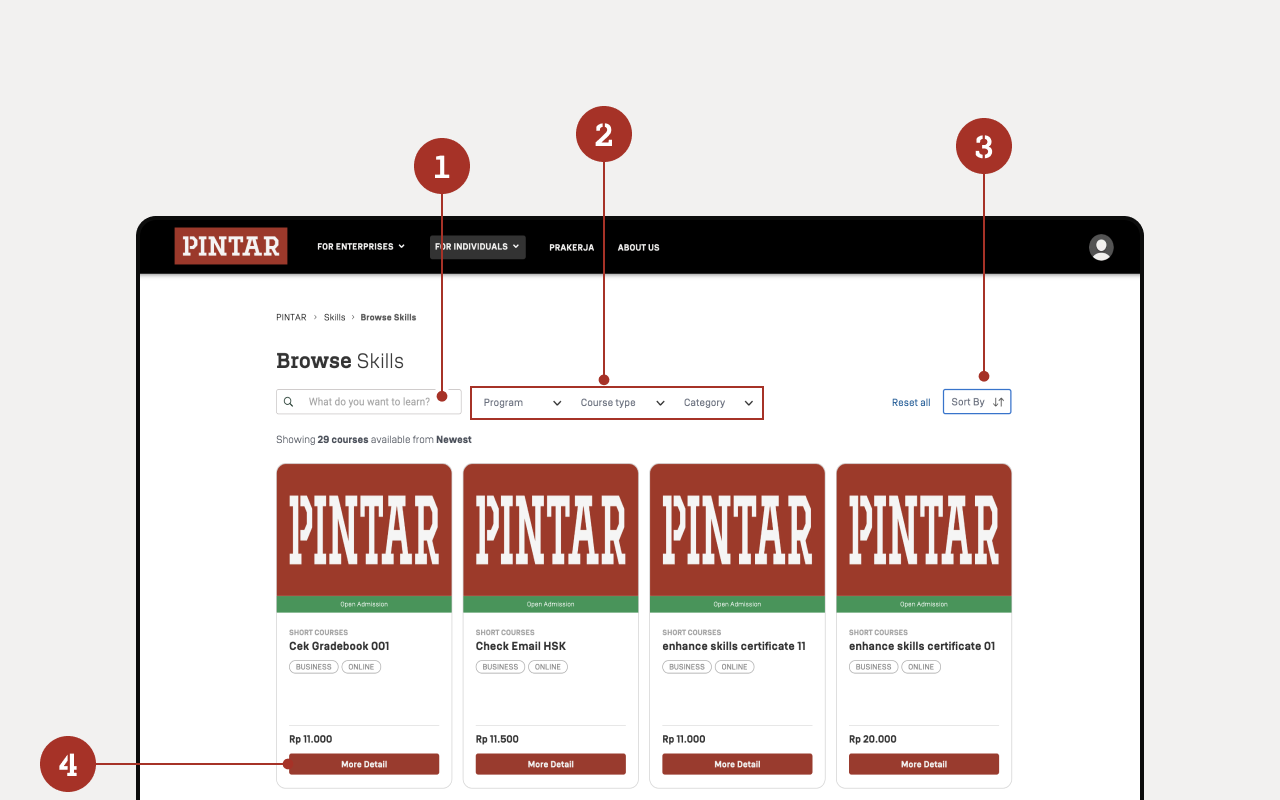
Entering the Browse Skills Menu
- On the Browse Skills menu, there is a search bar to make it easier to find the desired course.
- Several categories can be filtered based on the user’s interests and preferences.
- Users can sort skills as desired.
- Click the "More Detail" button if you want to buy the Skill.
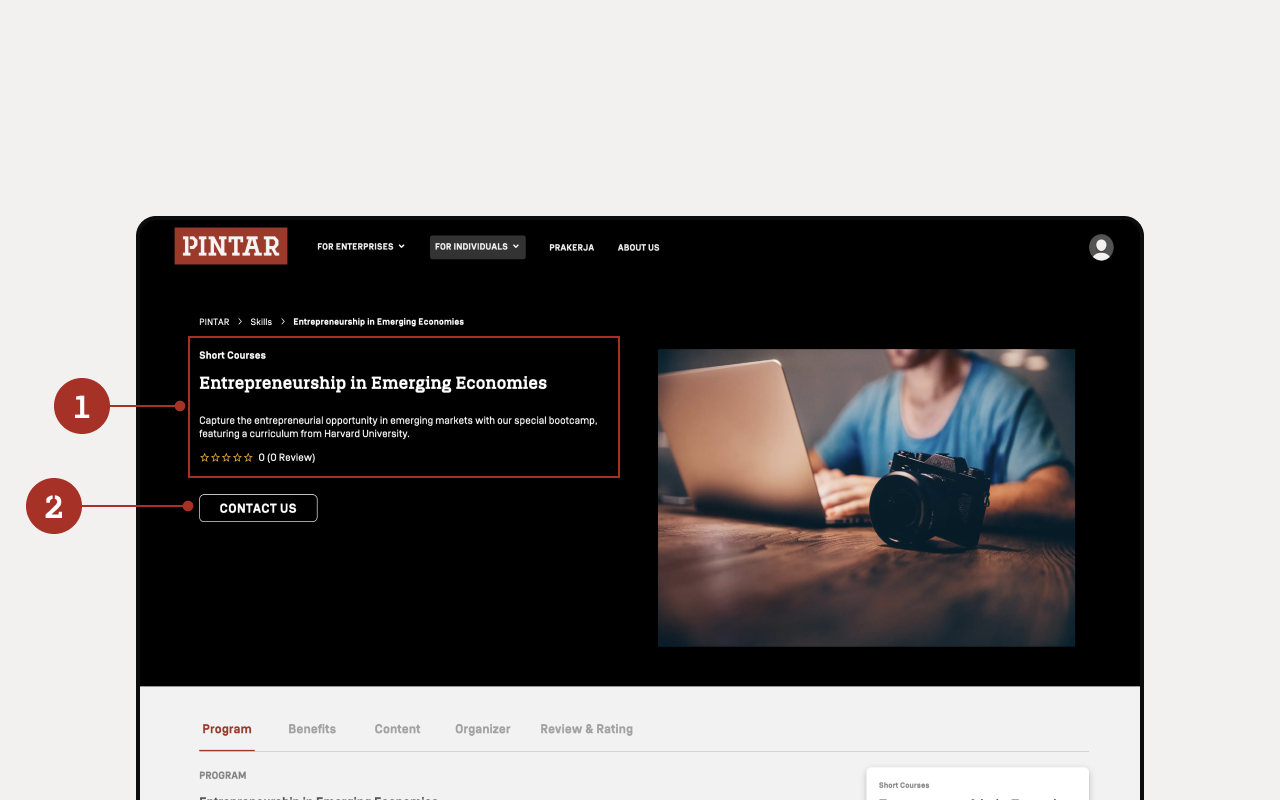
Entering Detail Skills Menu
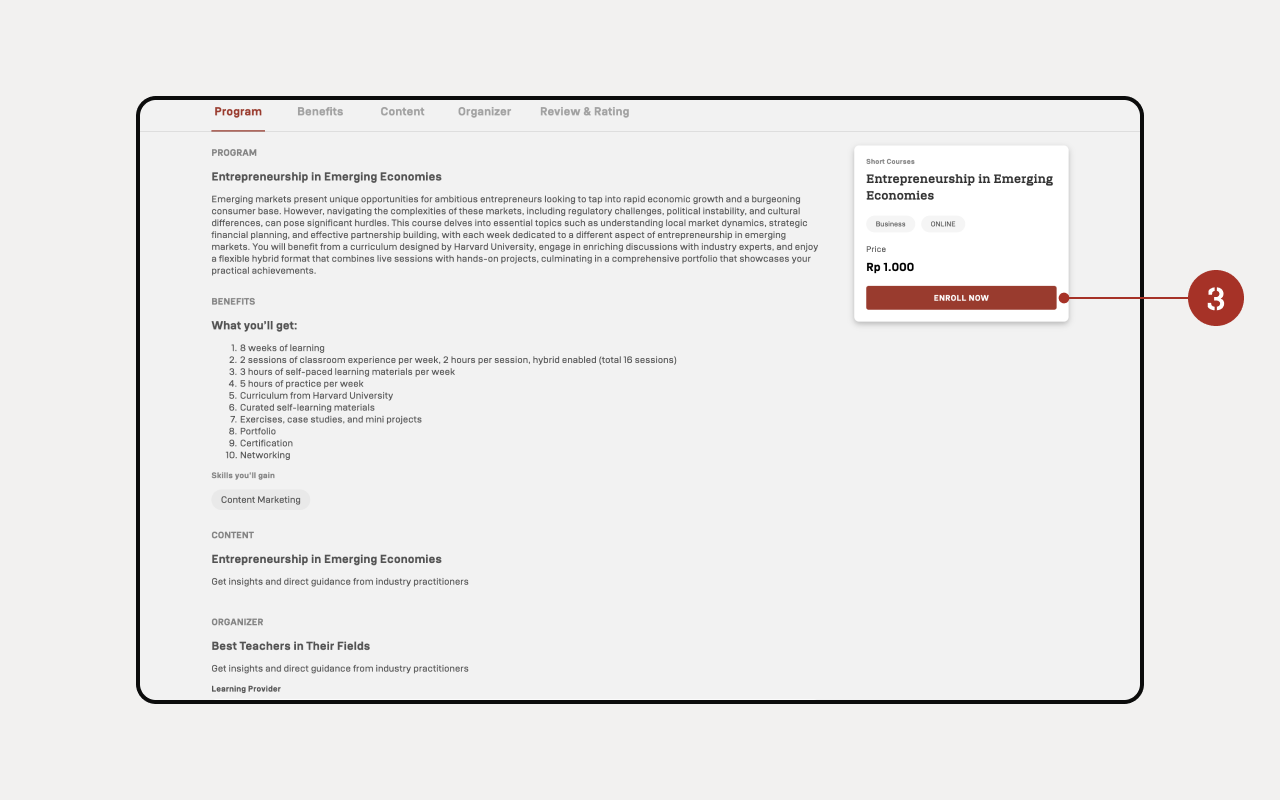
- On the detail page, there is a skill title, a brief explanation, and also a rating for the skill.
- There is a "Contact Us" button that if clicked will lead to WhatsApp.
There is a more detailed explanation of the skill.
- Click "Enroll Now" if you want to buy the skill.
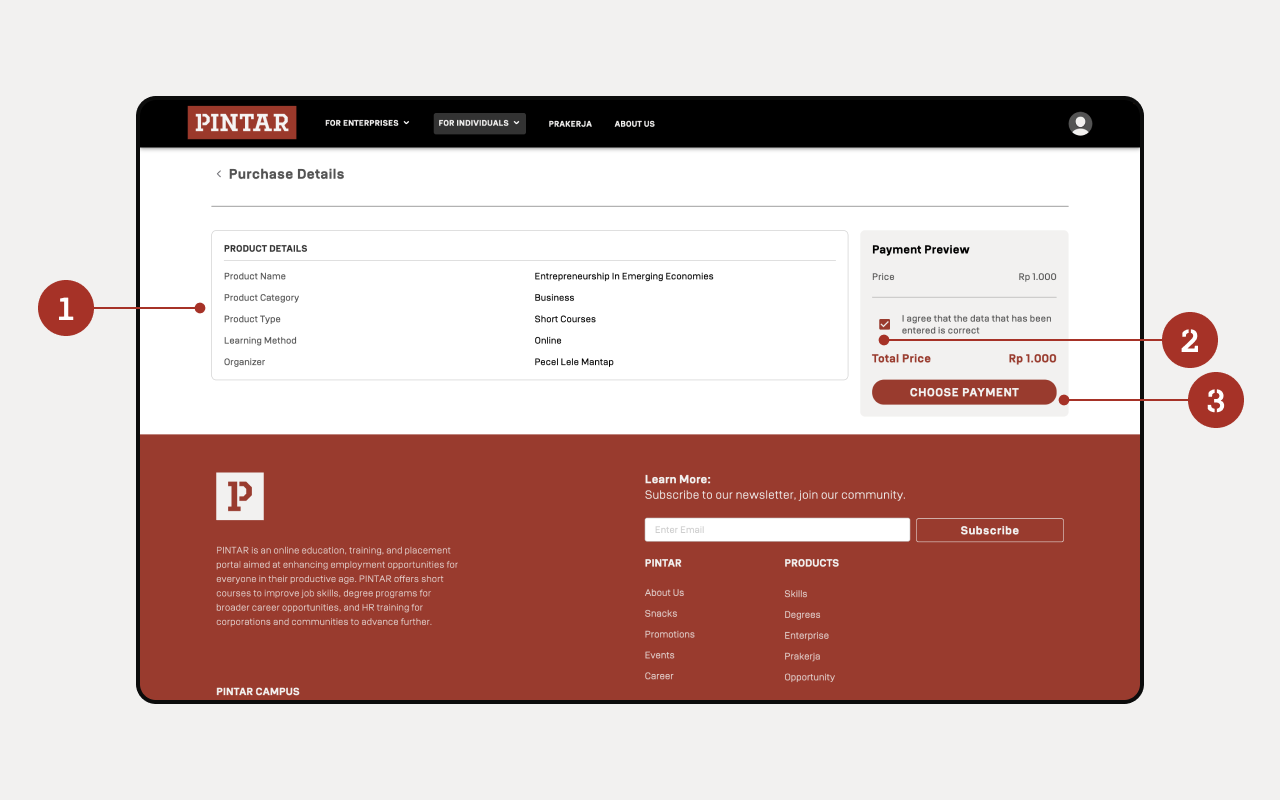
Entering Purchase Detail Menu
- There are details about the product to be purchased.
- Users must click the checklist button.
- If you want to continue the purchase, click the "Choose Payment" button.
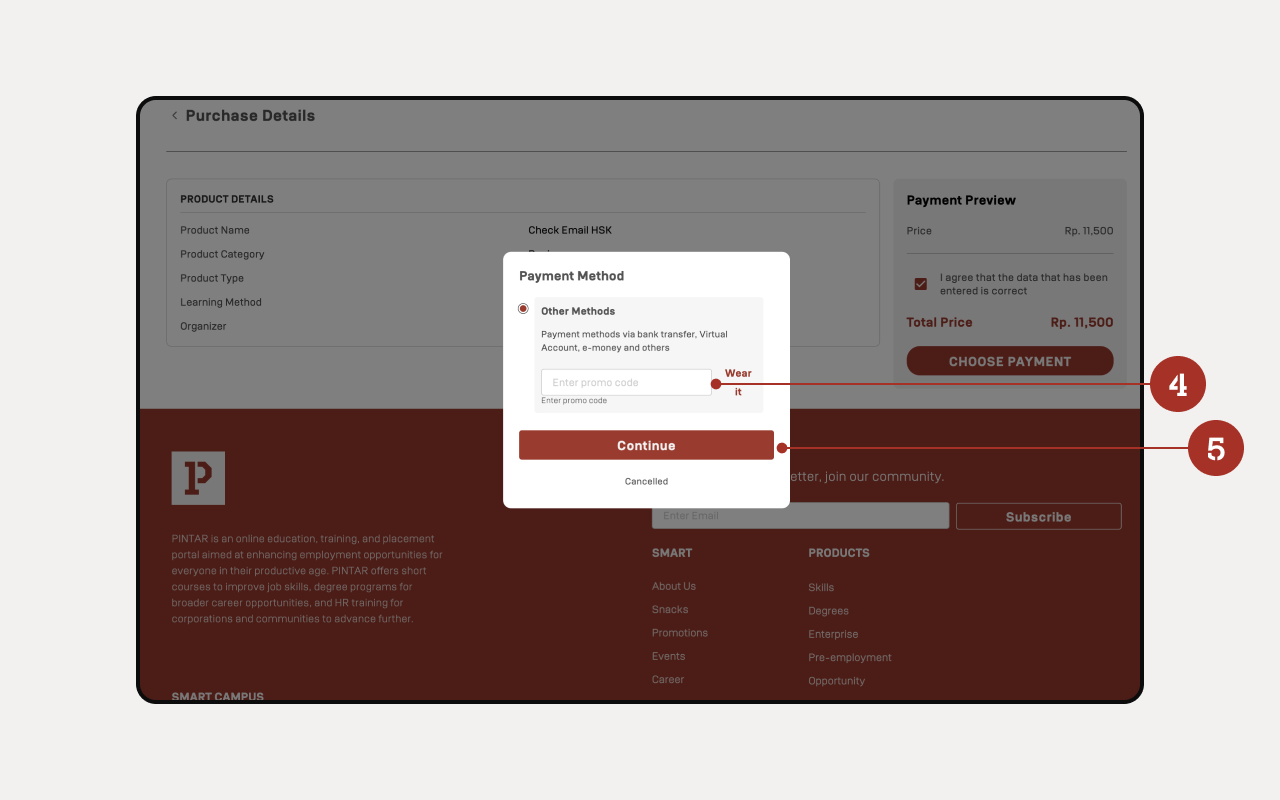
- Enter "Promo Code" if you have a promo code.
- If there is no promo code, then just click "Continue".
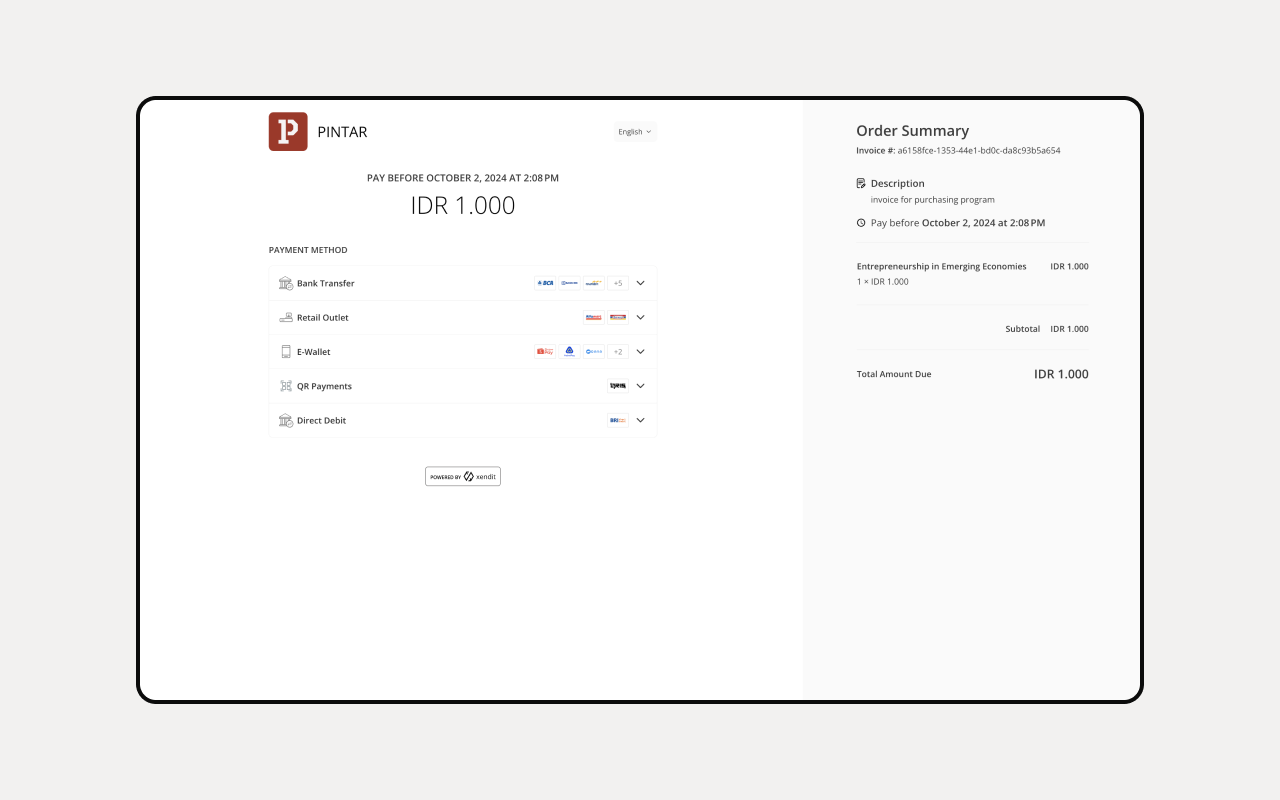
There are several payment method options that can be adjusted to the user and also a summary of the order up to the total purchase. Users simply choose one of the payment methods.
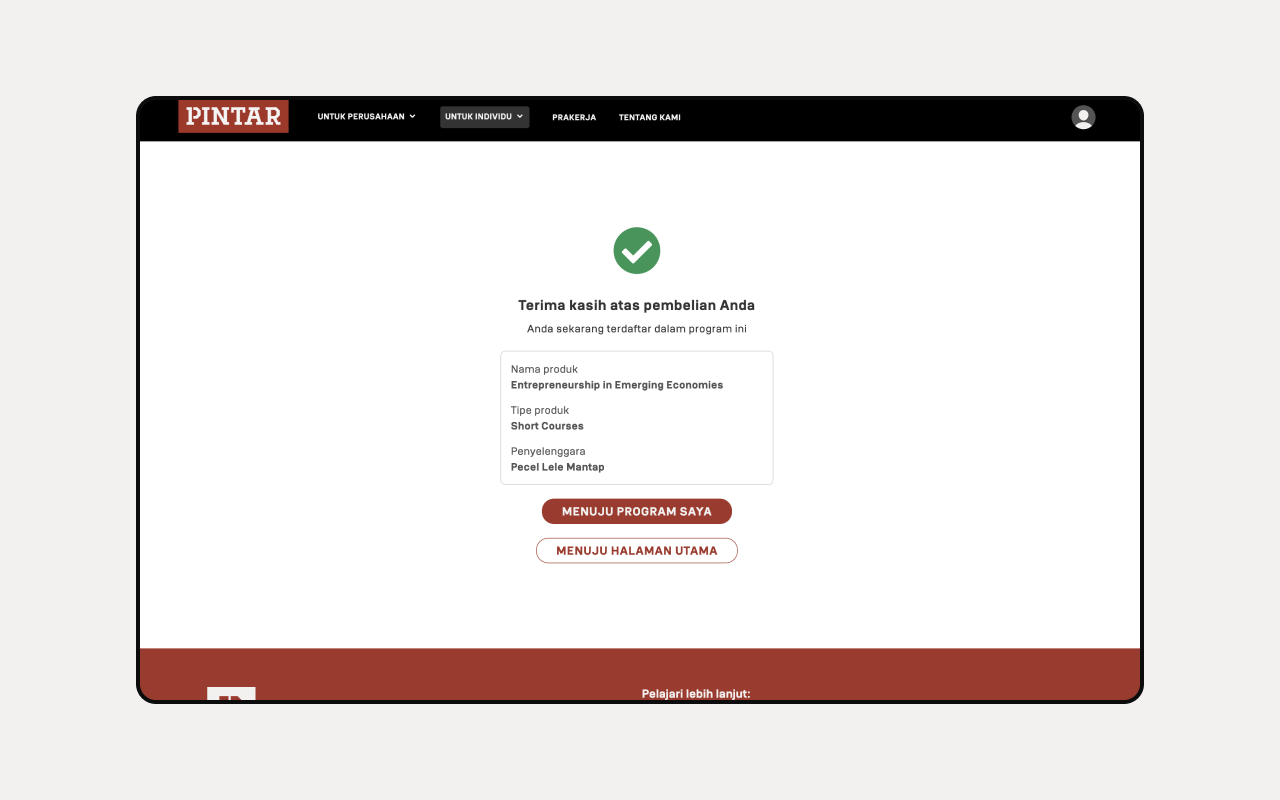
If the payment is successful, information will appear that the purchase was successful.
Entering the Course
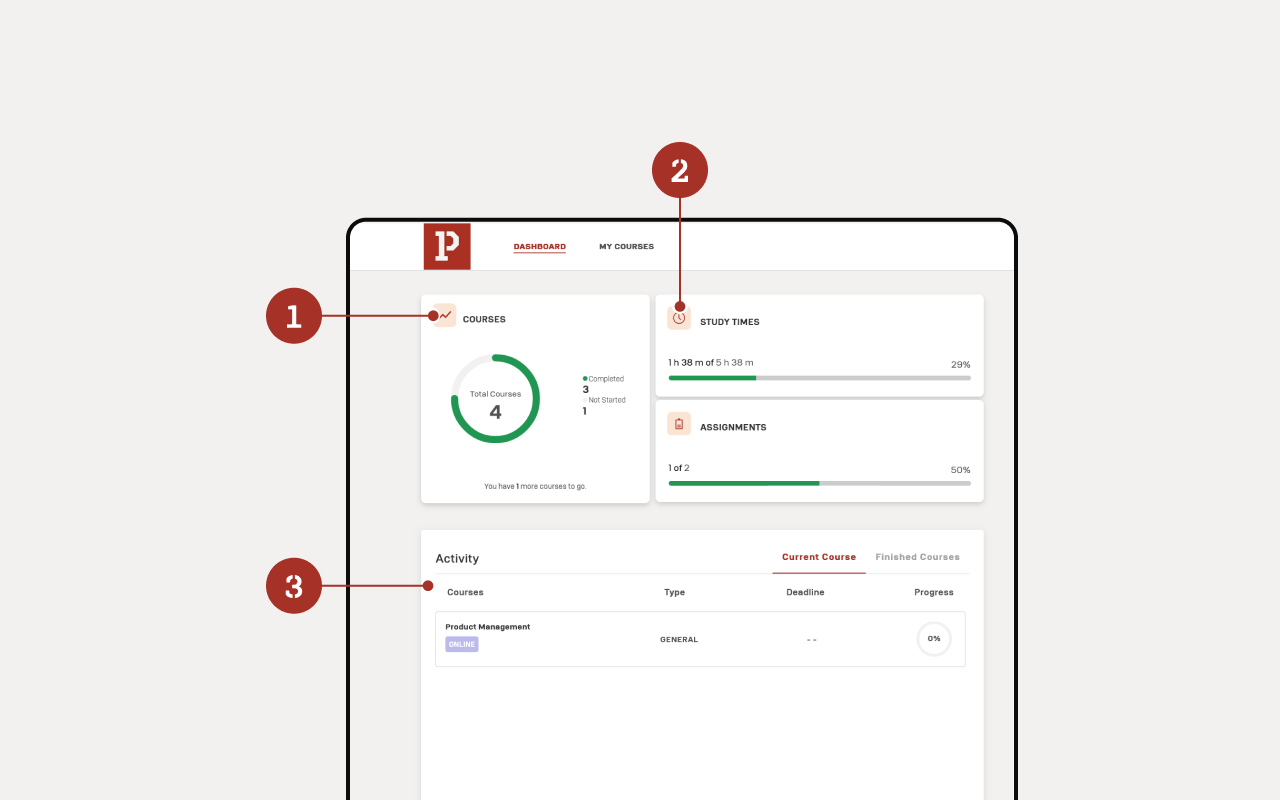
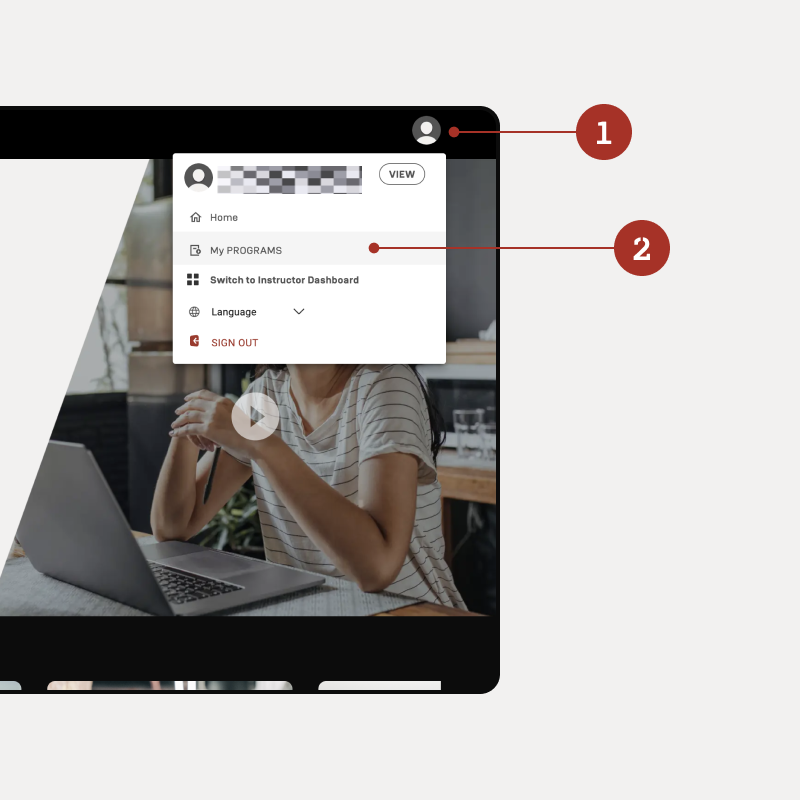
After logging in to skills.pintar.co, click on the profile to go to the program you are enrolling in.
Click "My Programs" to see the programs you are enrolling in.
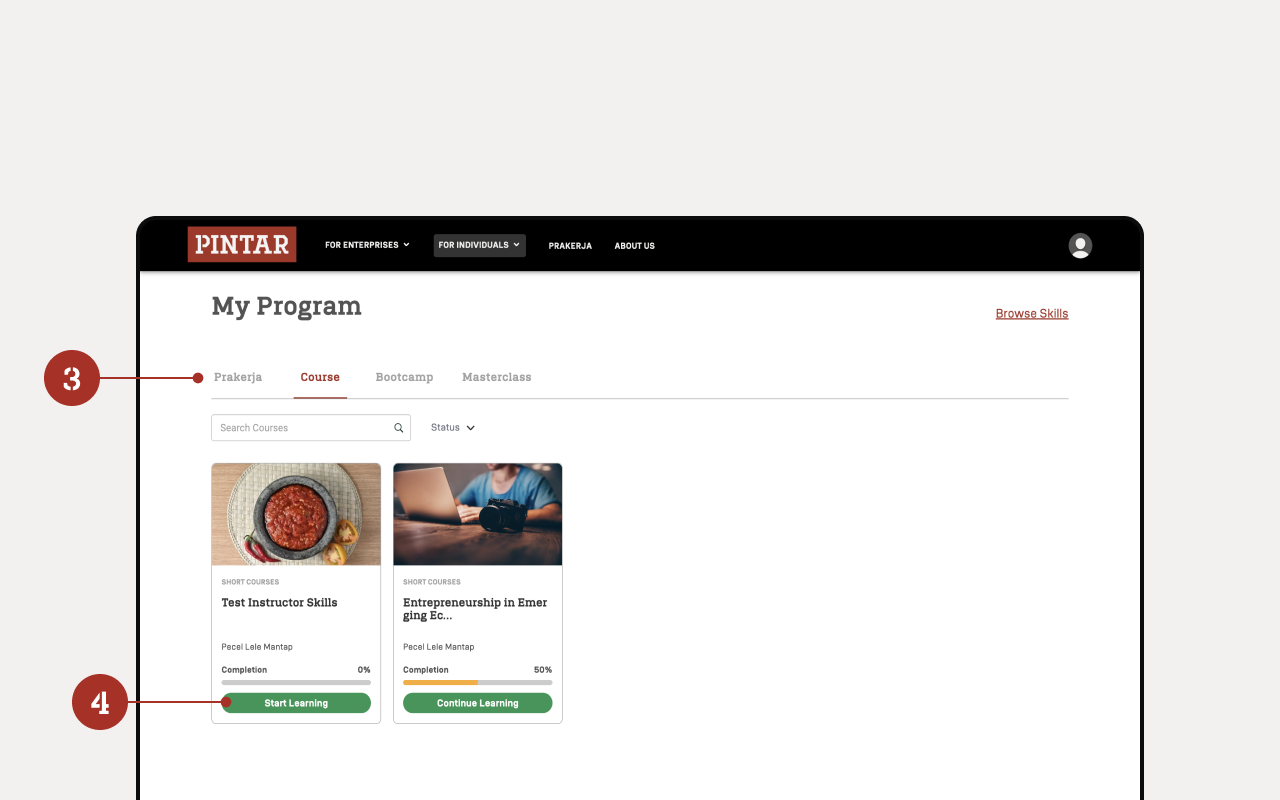
On the My Program menu, there are several tabs that can be selected according to the product you want to view.
There is a “Start Learning” button that can be clicked to view and start learning the course or “Continue Learning” button to continue learning the course.
Understanding the Course (Overview)
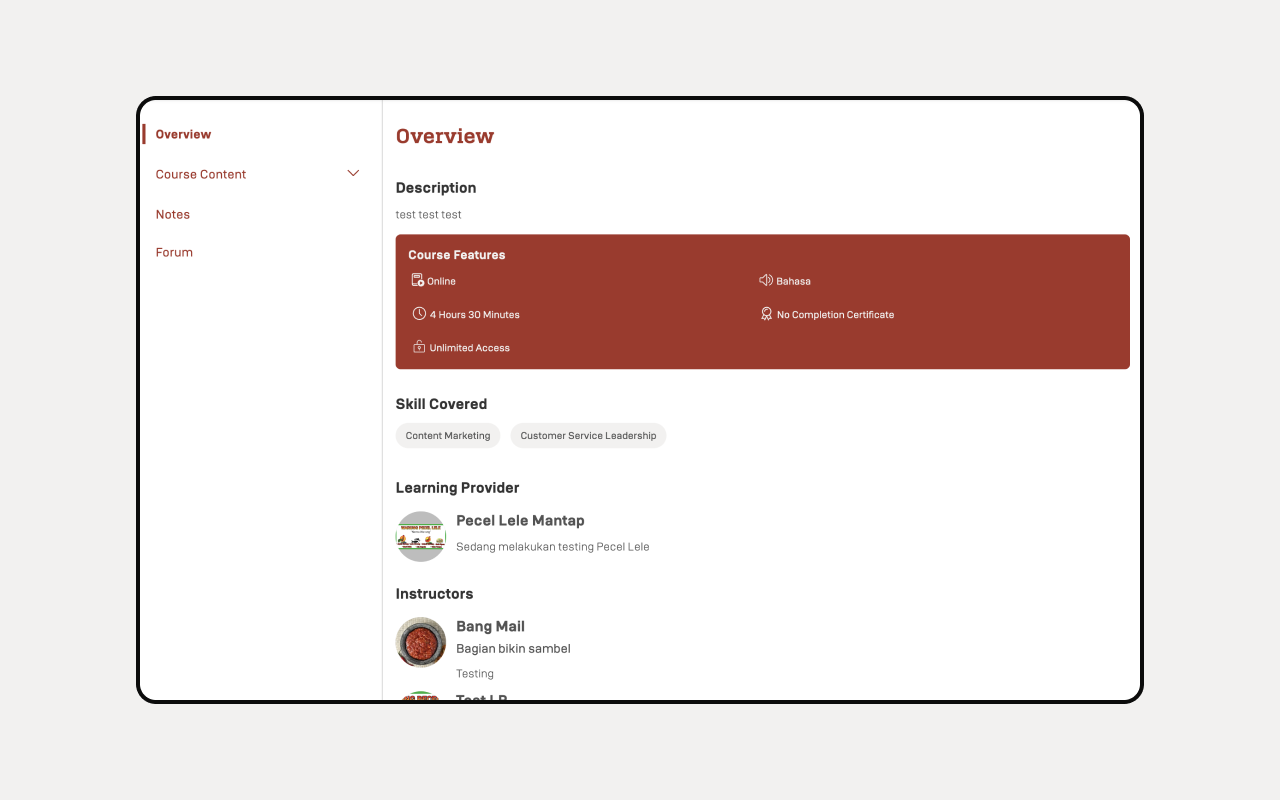
This Overview's menu provides an overview of the course, with several key elements:
- Description: A brief summary or explanation of the course content.
- Course Feature: Displays the features of the course, such as duration, accessibility, language used, and information about the completion certificate.
- Skill Covered: Lists the skills that will be learned or mastered after completing the course.
- Learning Provider: Shows the provider or institution offering the course.
- Instructors: Lists the instructors involved in the course, including their names and a brief description.
Understanding the Course (Course Content)
This Course Content's menu contains a list of the course materials or modules. There is also a menu tab for writing notes and comments.
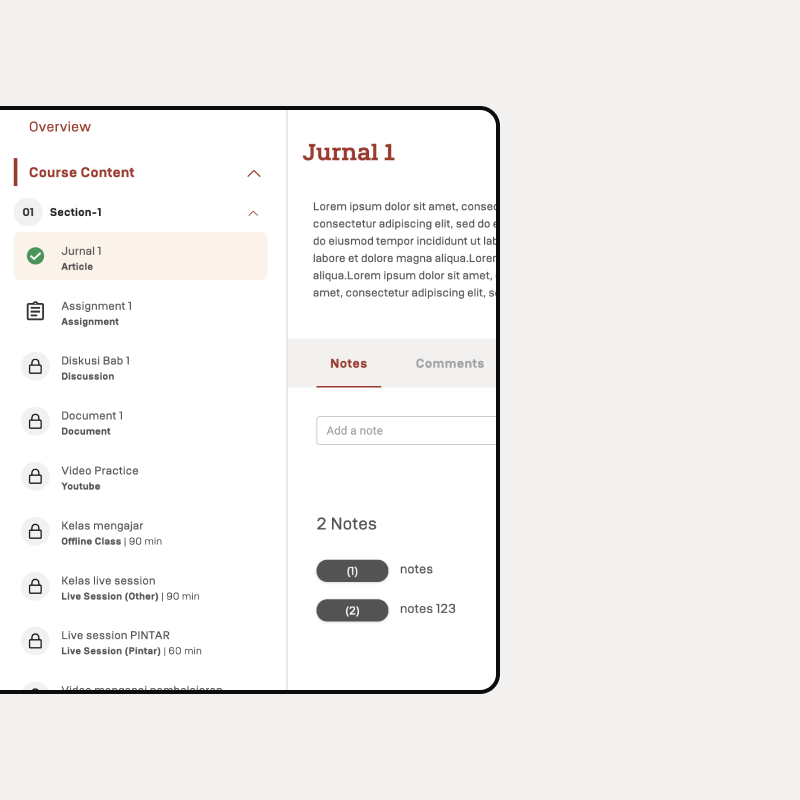
Understanding the Course (Article Subcontent)
An article like "Jurnal 1" provides written content for students to read and learn from. The platform allows users to take notes, add comments, and engage with the material for better understanding.
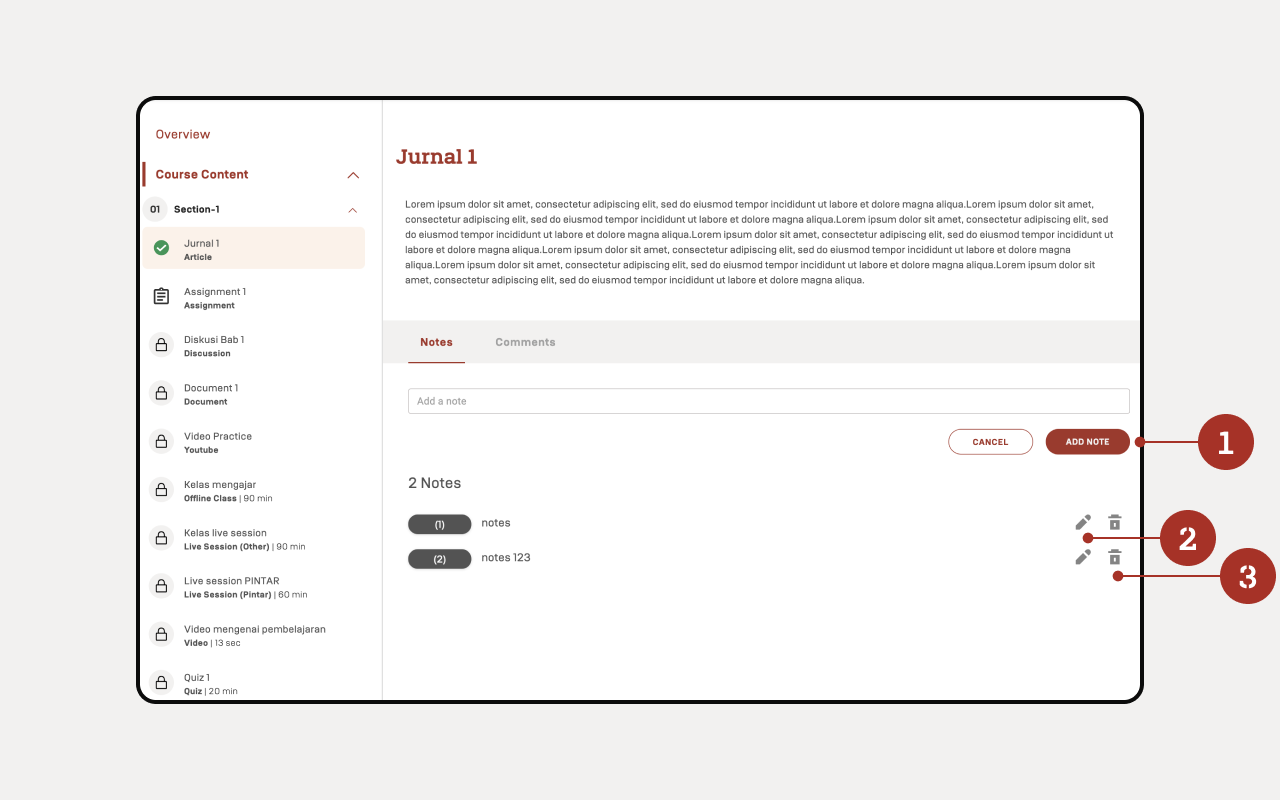
Notes:
This Notes's menu allows users to create or access notes they may have taken while following the course. These notes help users keep track of important points.
- Click "Notes" to add notes. The results of the notes can only be seen by the user.
- Notes that have been created can be edited.
- Notes that have been created can be deleted.
Comments:
This Comments menu allows users to comment on the course they are taking.
- Click "Submit" to add a comment. The results of the comments can be seen by users, instructors, and users taking the same course.
- There are filters to sort comments by Newest, Oldest, or Most Popular.
- Comments that have been created can be deleted.
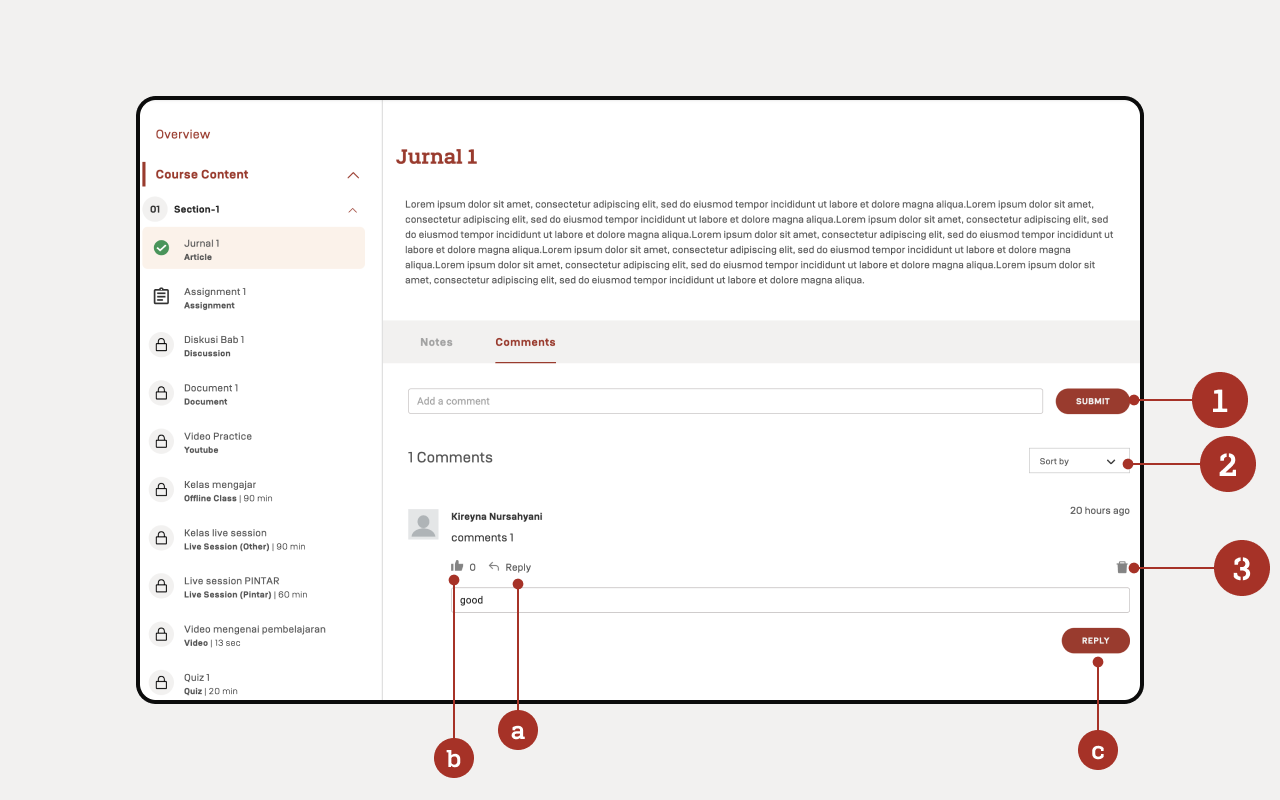
a. You can reply to other people's comments by clicking the Reply.
b. Comments can also be liked.
c. To post a comment, click the Reply button in the bottom right corner.
Understanding the Course (Assignment Subcontent)
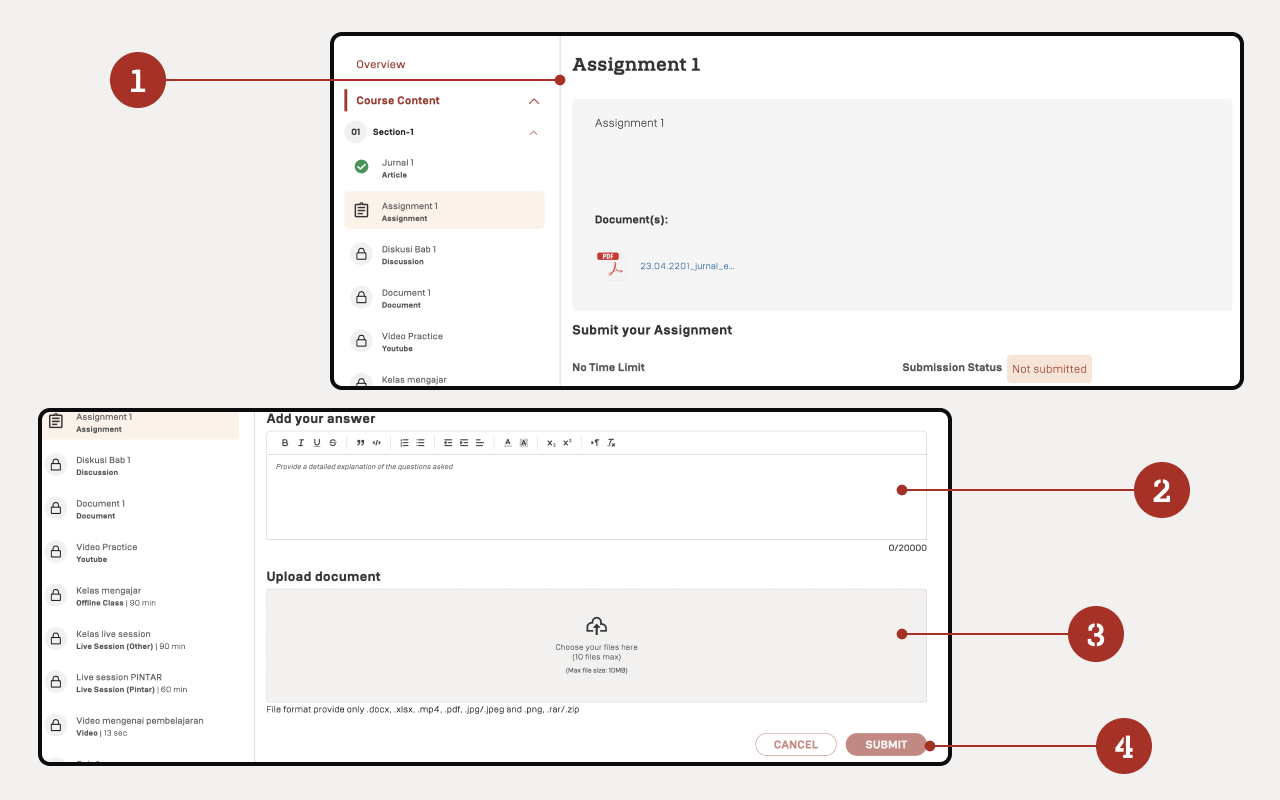
Click "Assignment" to see an example of a document subcontent.
- Course Content Overview : Displays the course materials and activities, allowing users to navigate and access assignments, discussions, and documents.
- Answer Input Field: A text box for typing assignment answers with formatting options and a 20,000 character limit.
- File Upload Area: Allows uploading up to 10 files (max 10MB each) in formats like .docx, .pdf, .jpg, and .mp4 to support the assignment.
- Submit Button: Click the "Submit" button to finalize and submit the assignment or "Cancel" to discard it.
Understanding the Course (Discussion Subcontent)
The Discussion Menu is a feature that enables students to engage in conversations and discussions about course topics.
- This is where users can type their responses to the discussion. It includes formatting options like bold, italic, lists, etc., with a 2000 character limit for each response.
- After writing a response, users can click the “Post” button to submit their answer to the discussion.
- The dropdown allows users to sort comments or answers based on criteria such as newest, oldest, or most popular, making it easier to navigate through responses.
- Users can delete their own posts by clicking the trash bin icon next to the comment.
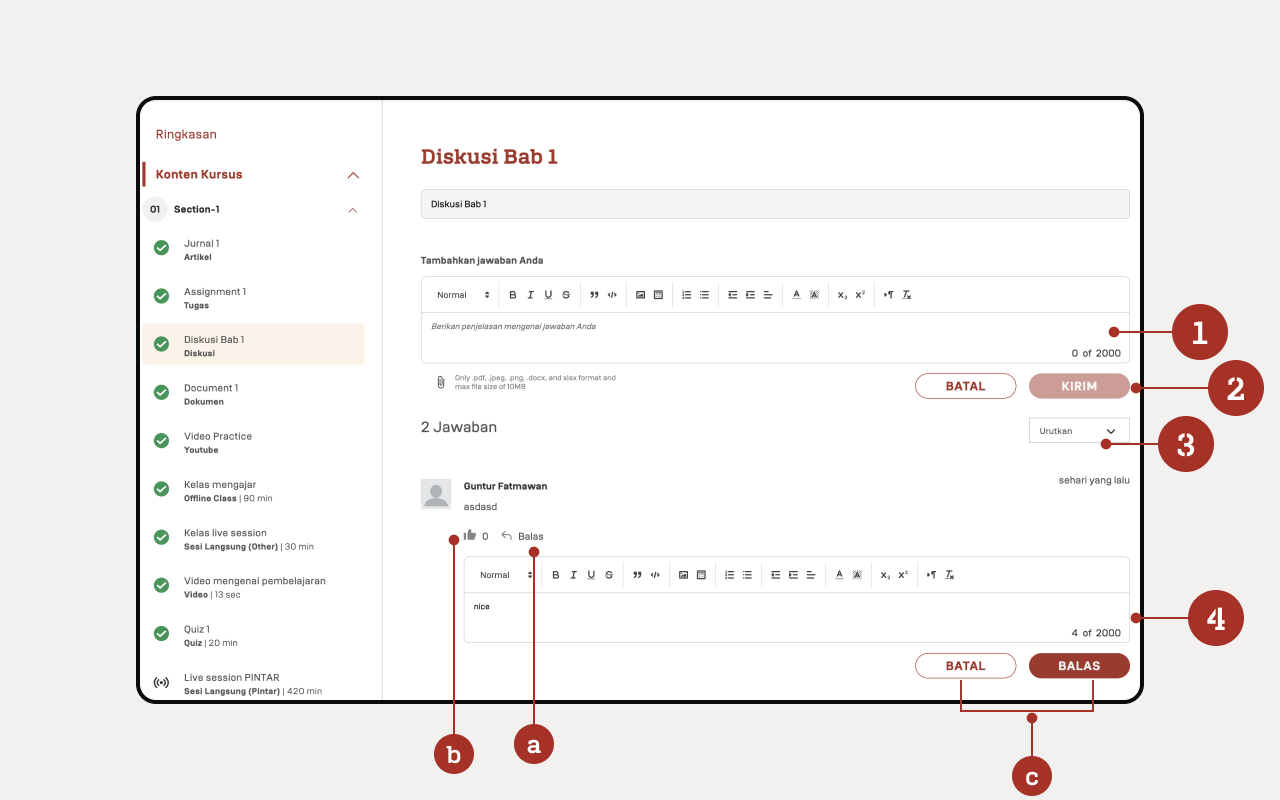
a. You can reply to other people's comments by clicking the Reply.
b. Comments can also be liked.
c. To post a comment, click the Reply button in the bottom right corner.
Understanding the Course (Document Subcontent)
In the Document type, users can view and read uploaded documents and provide Notes and Comments. However, users must read the document entirely before they are allowed to proceed to the next task.
- Click "View full screen" to see the document in full screen view. Click the "<" icon to exit the full screen view of the document.
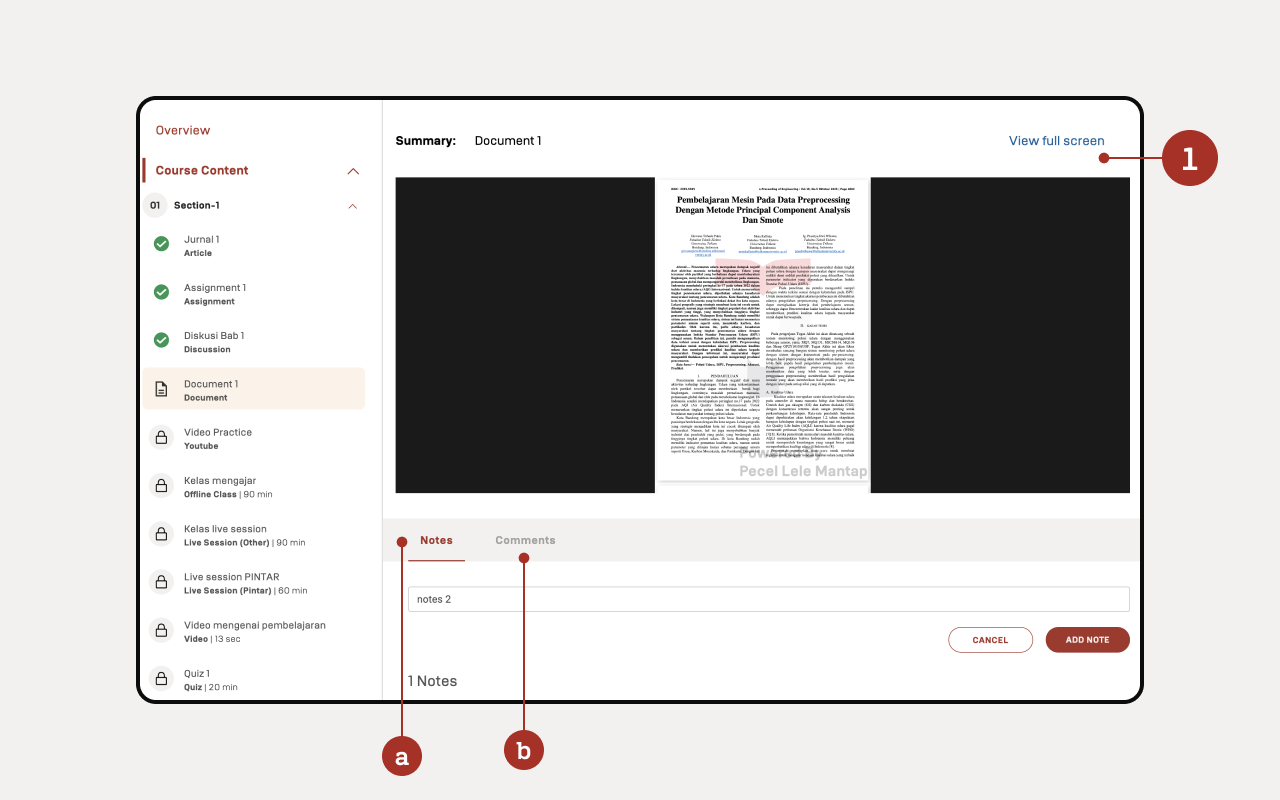
a. Notes:
This Notes's menu allows users to create or access notes they may have taken while following the course. These notes help users keep track of important points.
- Click "Notes" to add notes. The results of the notes can only be seen by the user.
- Notes that have been created can be edited.
- Notes that have been created can be deleted.
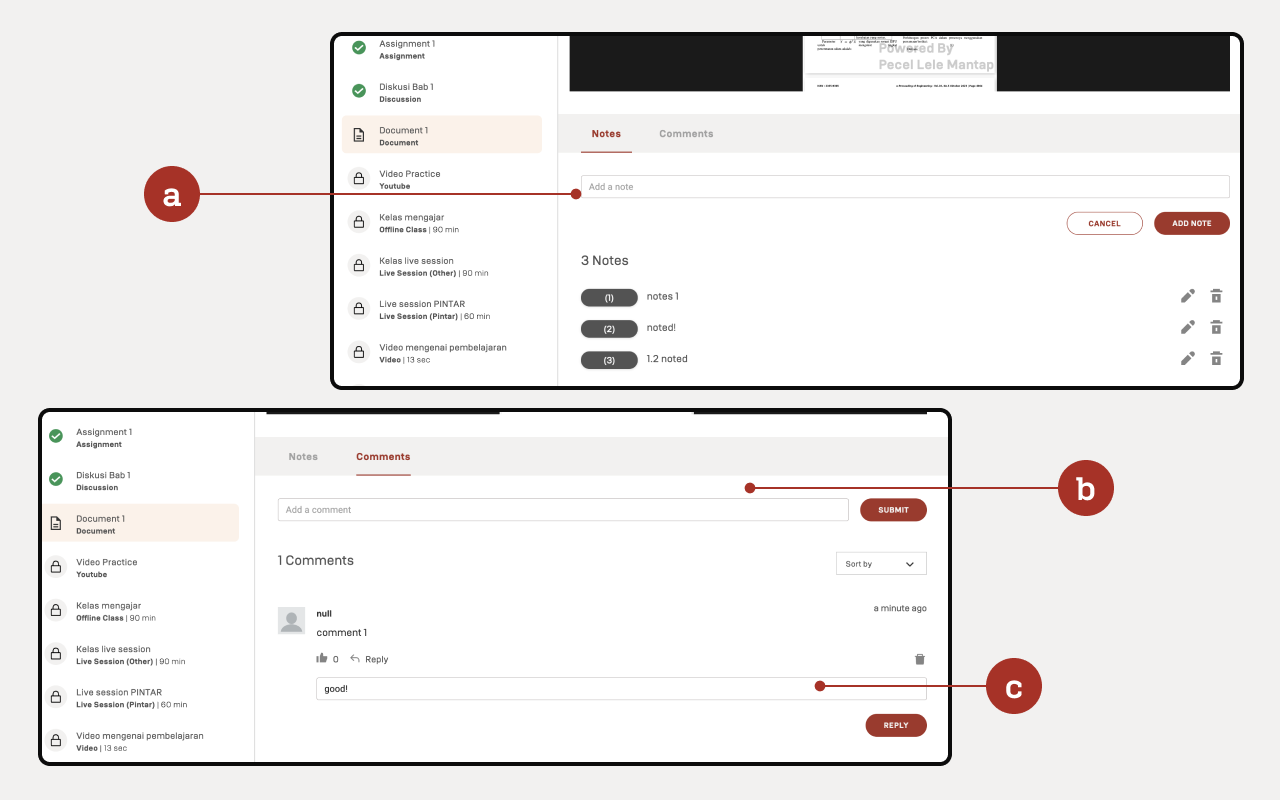
b. Comments:
This Comments menu allows users to comment on the course they are taking.
- Click "Submit" to add a comment. The results of the comments can be seen by users, instructors, and users taking the same course.
- There are filters to sort comments by Newest, Oldest, or Most Popular.
- Comments that have been created can be deleted.
c. Reply Comments:
This Reply Comments section allows users to reply other comment on the course they are taking.
- Click "Reply" text to add a comment. The results of the comments can be seen by users, instructors, and users taking the same course.
- Click "Reply" button to add a comment on document.
- Comments that have been created can be deleted.
Understanding the Course (Video Practice (YouTube) Subcontent)
The Video Practice section offers access to course-related videos, allowing students to watch and take notes and comments directly on the platform to enhance understanding.
- Click the "Play Video" button to start watching the practice video.
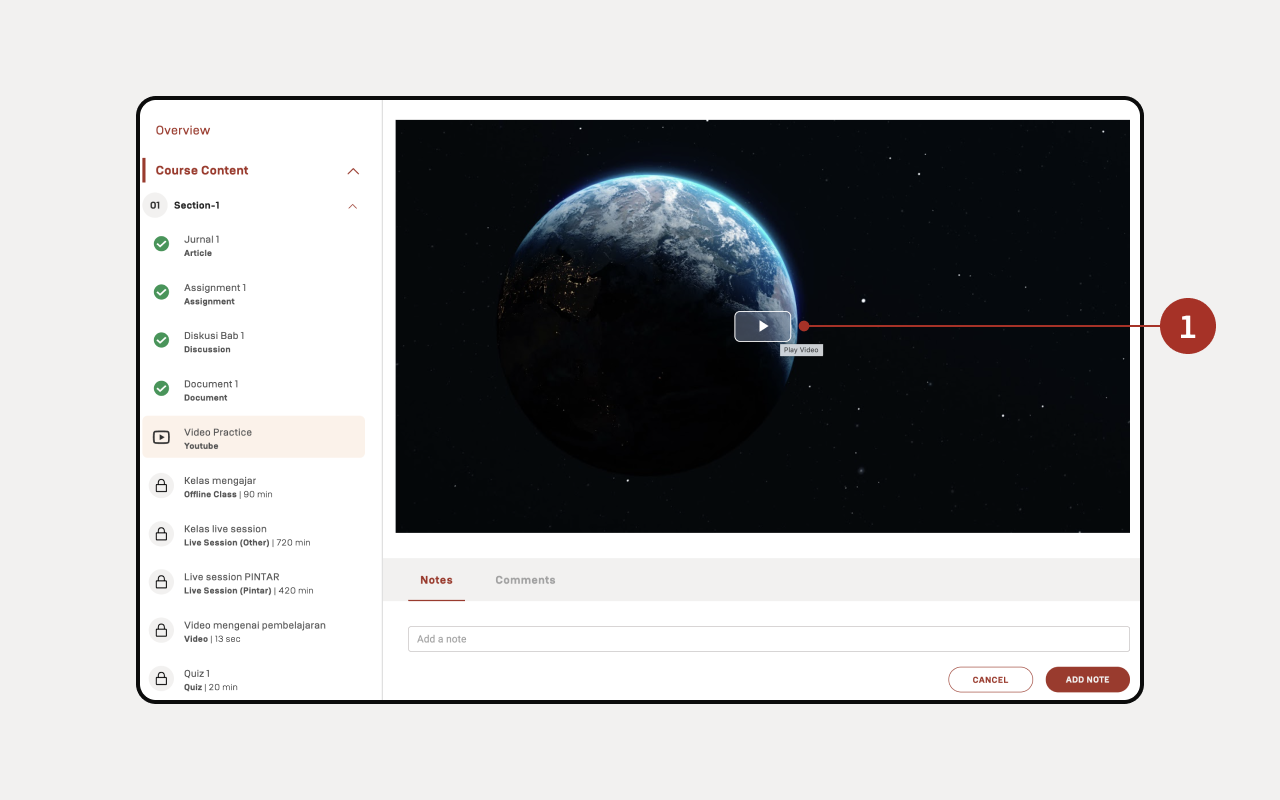
a. Notes:
This Notes's menu allows users to create or access notes they may have taken while following the course. These notes help users keep track of important points.
- Click "Notes" to add notes. The results of the notes can only be seen by the user.
- Notes that have been created can be edited.
- Notes that have been created can be deleted.
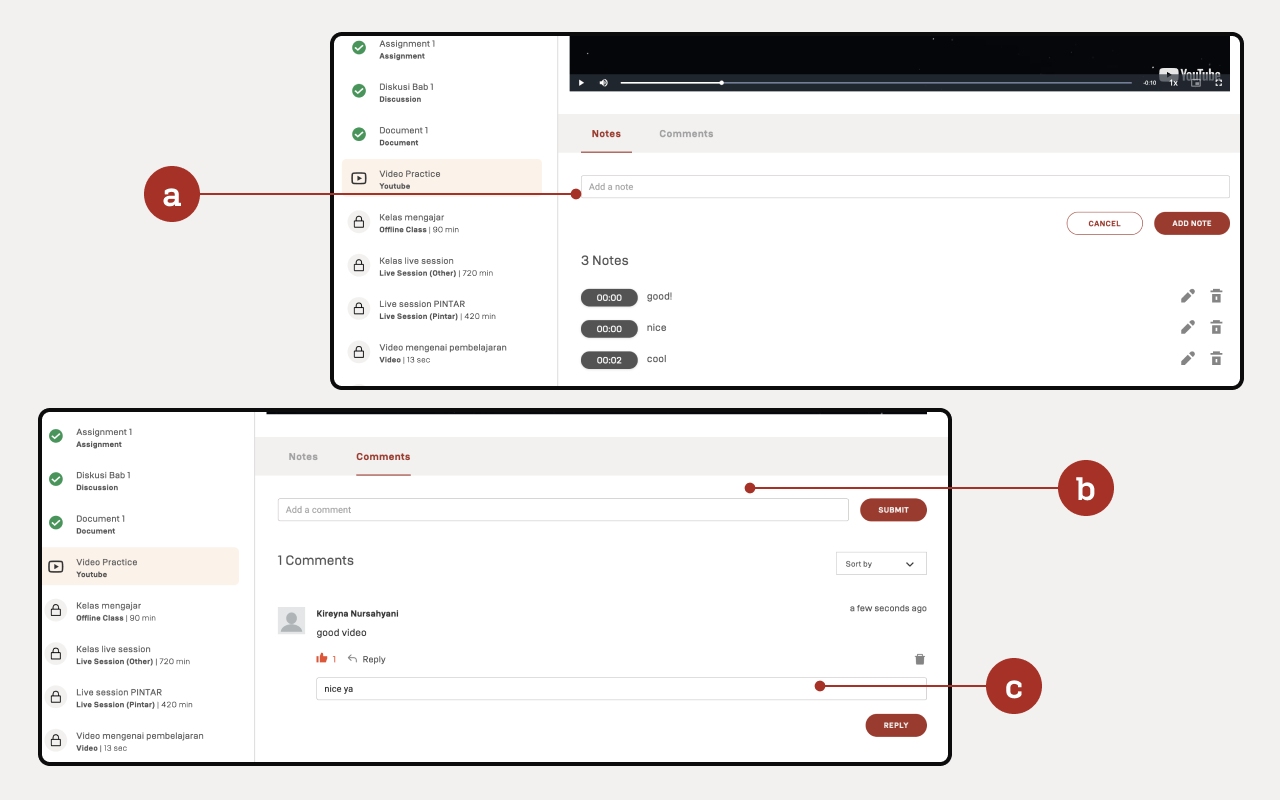
b. Comments:
This Comments menu allows users to comment on the course they are taking.
- Click "Submit" to add a comment. The results of the comments can be seen by users, instructors, and users taking the same course.
- There are filters to sort comments by Newest, Oldest, or Most Popular.
- Comments that have been created can be deleted.
c. Reply Comments:
This Reply Comments section allows users to reply other comment on the course they are taking.
- Click "Reply" text to add a comment. The results of the comments can be seen by users, instructors, and users taking the same course.
- Click "Reply" button to add a comment on document.
- Comments that have been created can be deleted.
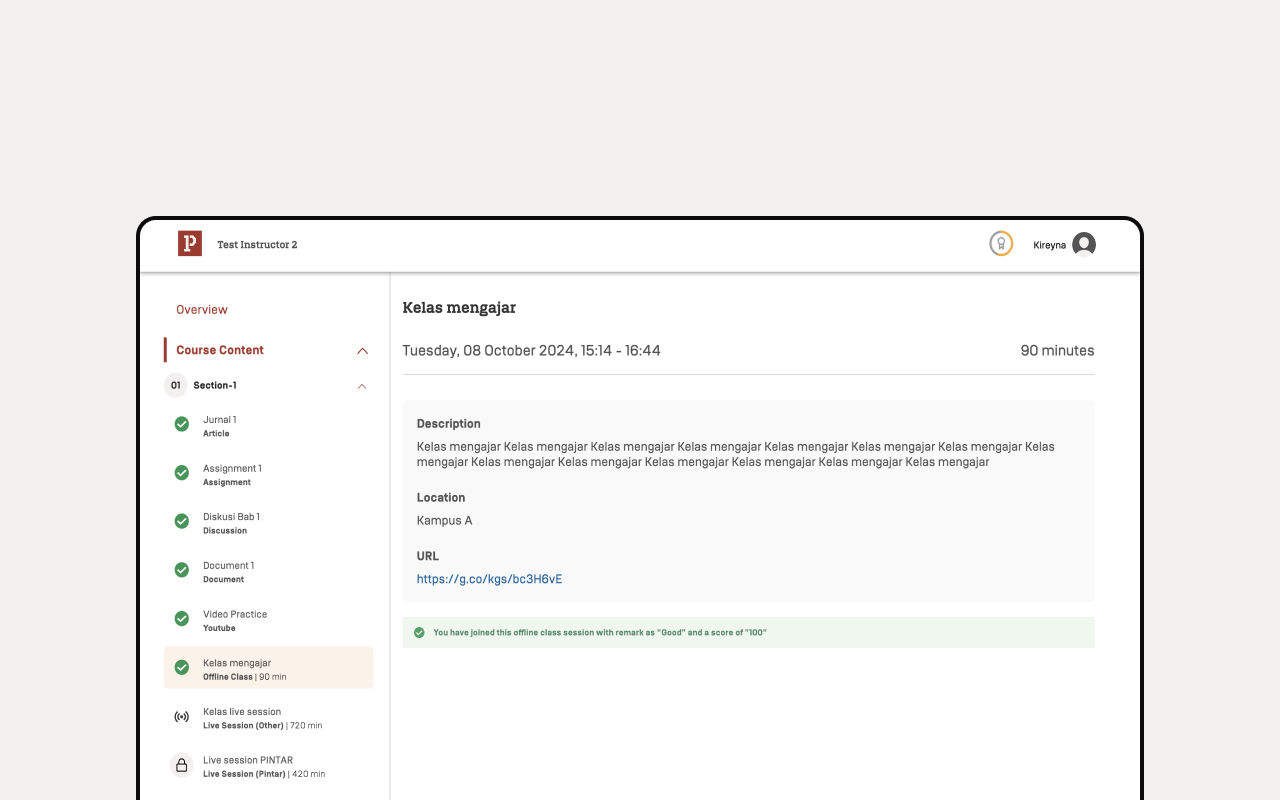
Understanding the Course (Offline Class Subcontent)
In the Offline Class menu, users can view the details of an offline class session such as:
- Title.
- Scheduled time.
- Description.
- Location.
- URL for more information.
Understanding the Course (Live Session (other) Subcontent)
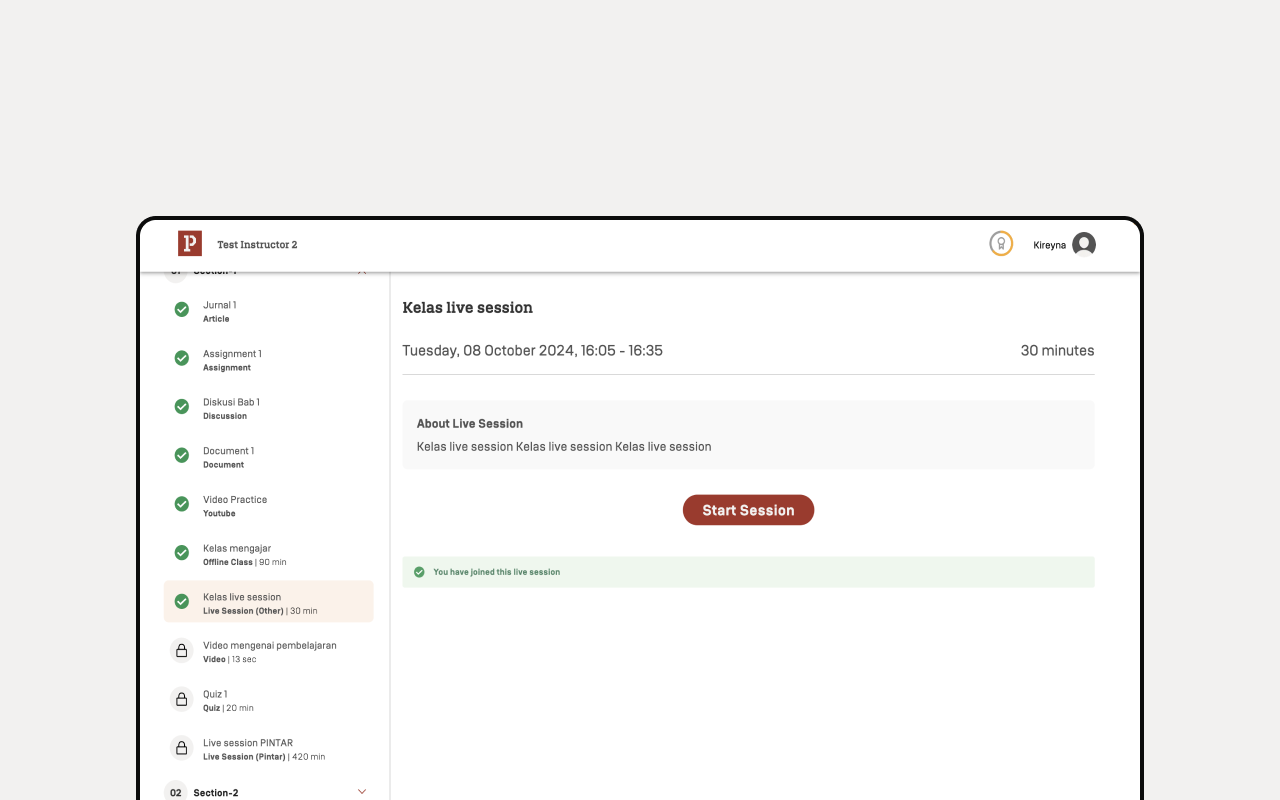
- Click "Live Session" to see an example of live session subcontent.
- After ensuring the title, date, time, duration, and description of the live session are correct, click "Start Session" to join the live session.
Understanding the Course (Video Subcontent)
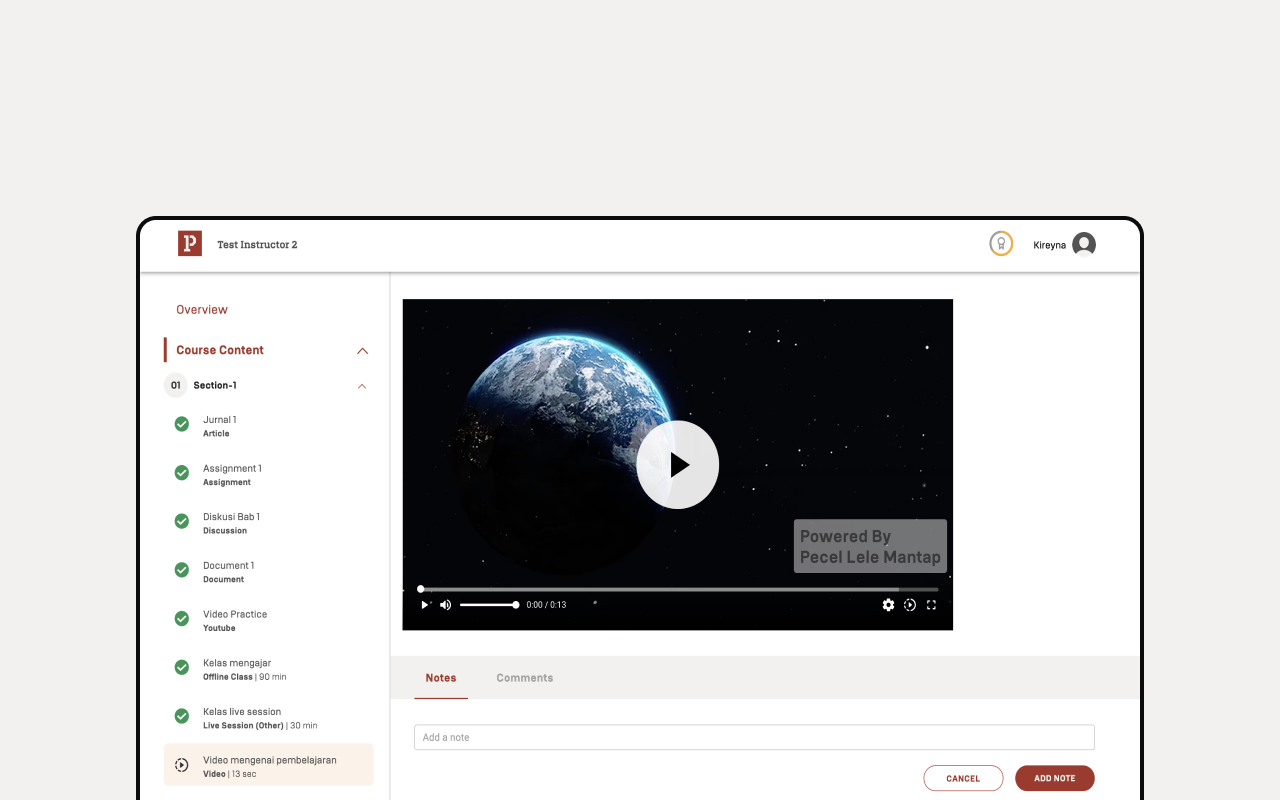
The Video Practice section offers access to course-related videos, allowing students to watch and take notes and comments directly on the platform to enhance understanding.
a. Notes:
This Notes's menu allows users to create or access notes they may have taken while following the course. These notes help users keep track of important points.
- Click "Notes" to add notes. The results of the notes can only be seen by the user.
- Notes that have been created can be edited.
- Notes that have been created can be deleted.
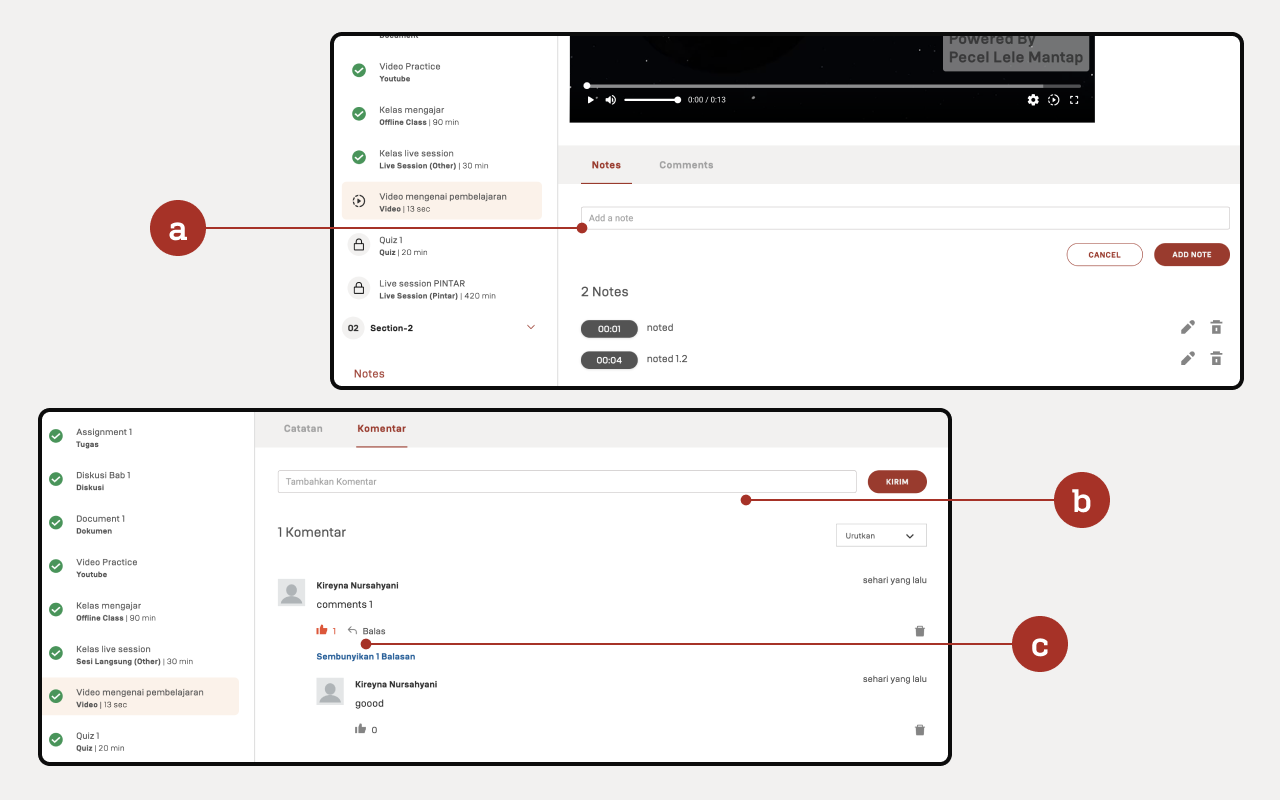
b. Comments:
This Comments menu allows users to comment on the course they are taking.
- Click "Submit" to add a comment. The results of the comments can be seen by users, instructors, and users taking the same course.
- There are filters to sort comments by Newest, Oldest, or Most Popular.
- Comments that have been created can be deleted.
c. Reply Comments:
This Reply Comments section allows users to reply other comment on the course they are taking.
- Click "Reply" text to add a comment. The results of the comments can be seen by users, instructors, and users taking the same course.
- Click "Reply" button to add a comment on document.
- Comments that have been created can be deleted.
Understanding the Course (Quiz Subcontent)
In the Quiz section, users can view quiz details like title, duration, questions, deadline, grading method, and minimum score. The quiz sub-content page will show the number of questions, assessment method, permitted attempts, minimum score, and quiz duration.
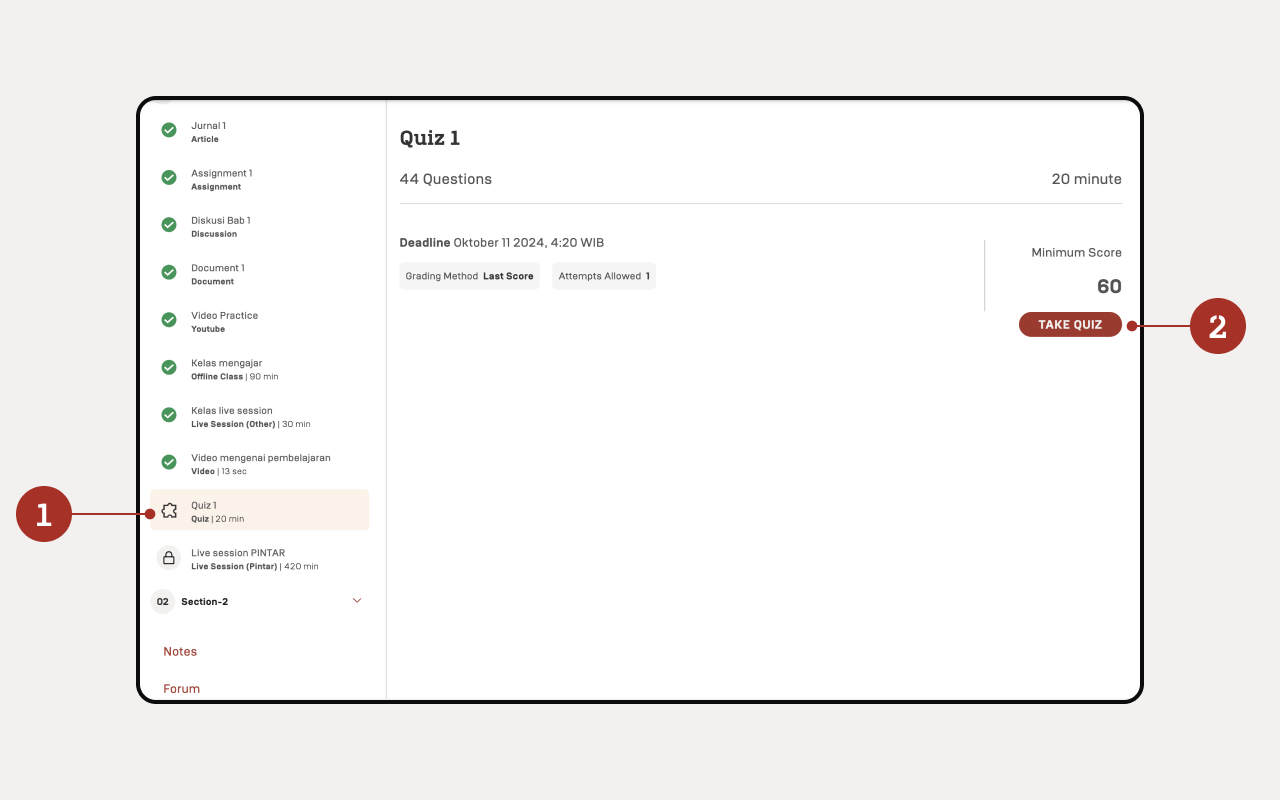
- Click "Quiz" to see an example of a quiz subcontent.
- Click "TAKE QUIZ" to start taking the quiz.
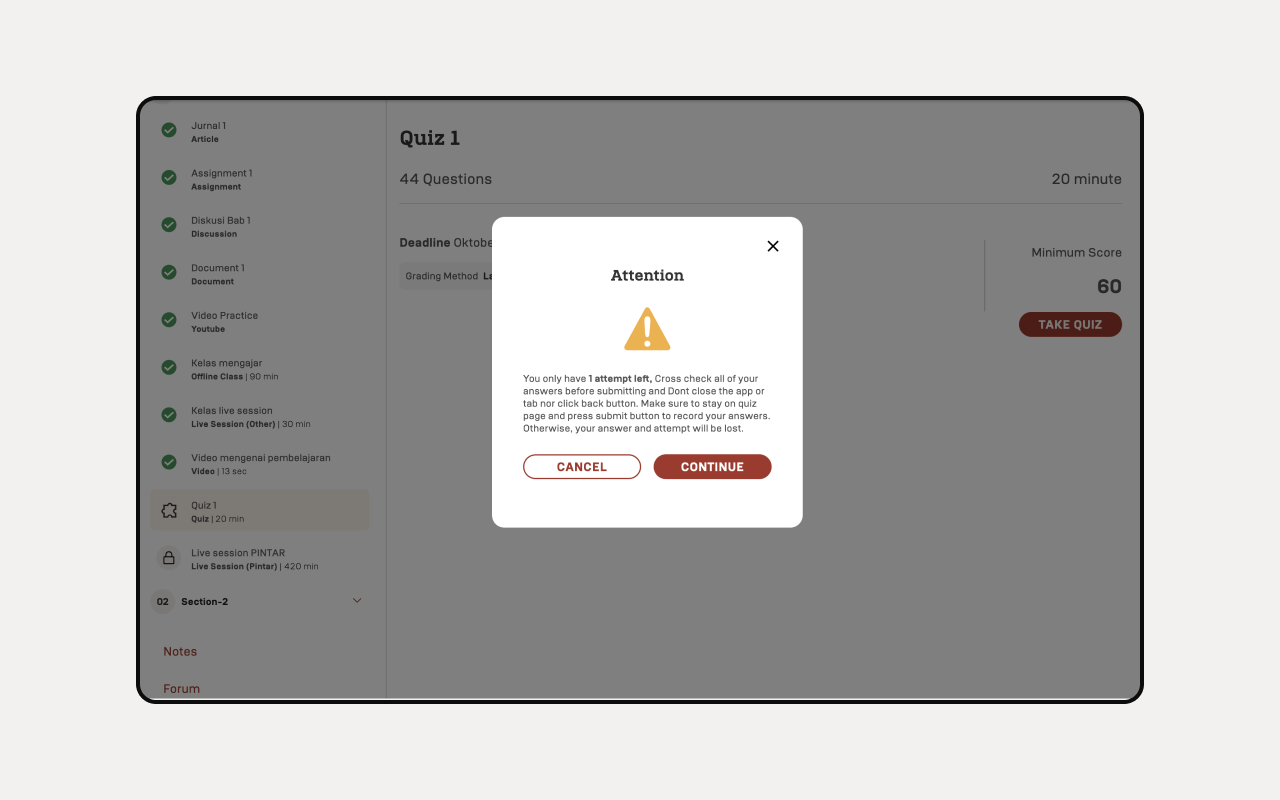
Before being directed to the quiz page, a pop-up will appear reminding you of the number of attempts, reminding you constantly to be careful when working on the questions, reminding you to always be on the quiz page, and clicking "Submit" at the end of the process so that the answers are recorded.
The quiz page will show the quiz title at the top and the number of questions below it.
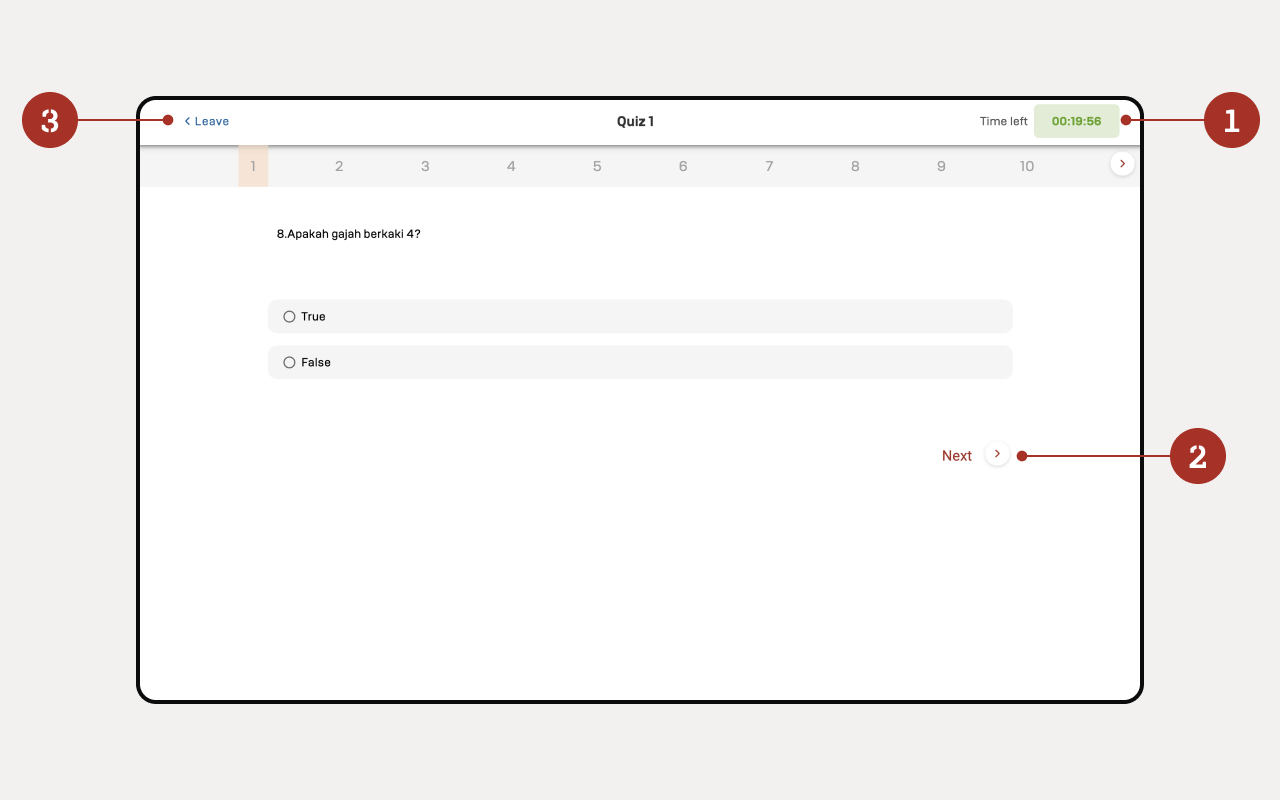
- The quiz duration is listed in the upper right corner.
- There is a "Next" button to see the next question.
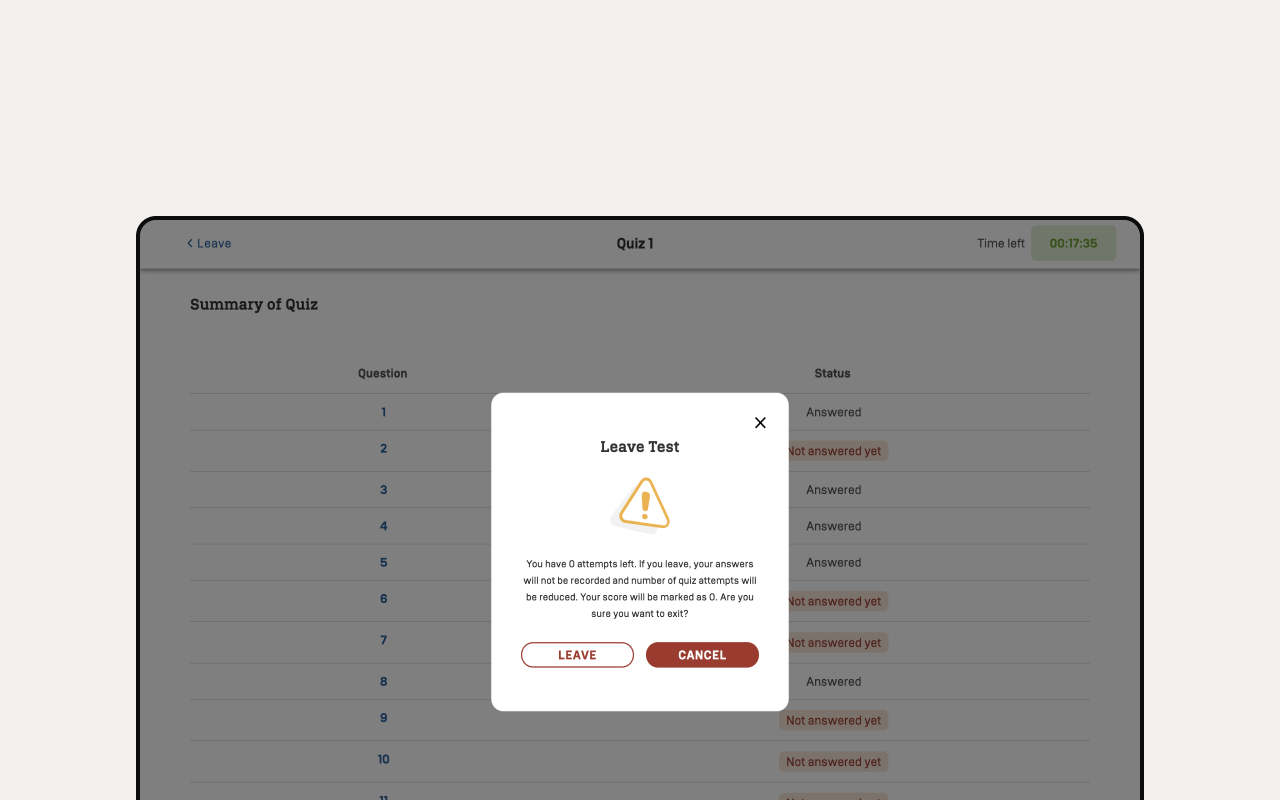
- There is a "Leave" button to exit the quiz page.
If you click the "Leave" button, a pop-up notification will appear stating that the score will be 0 if you exit in the middle of the quiz.
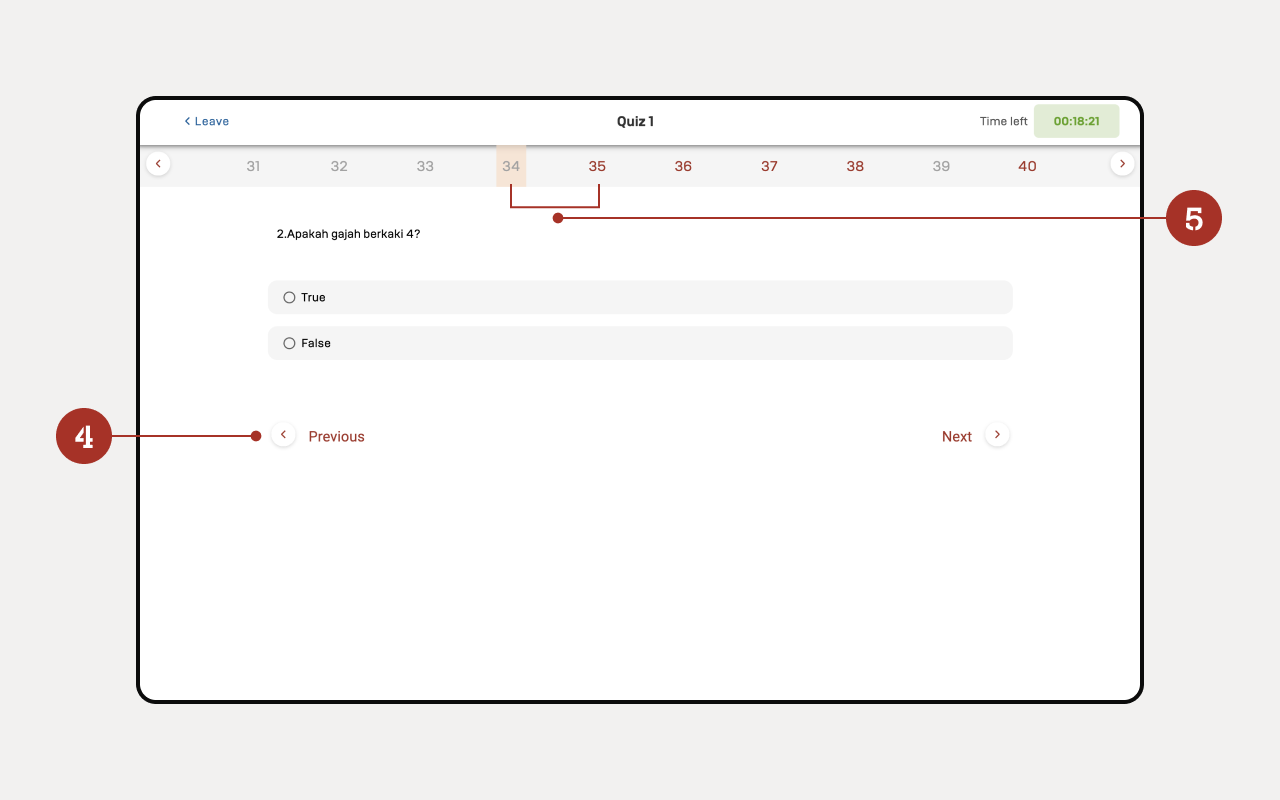
- To return to the previous page, click the "Previous" button.
- Numbers in gray mean that the answer has not been filled in, while numbers in red mean that the answer has been filled in.
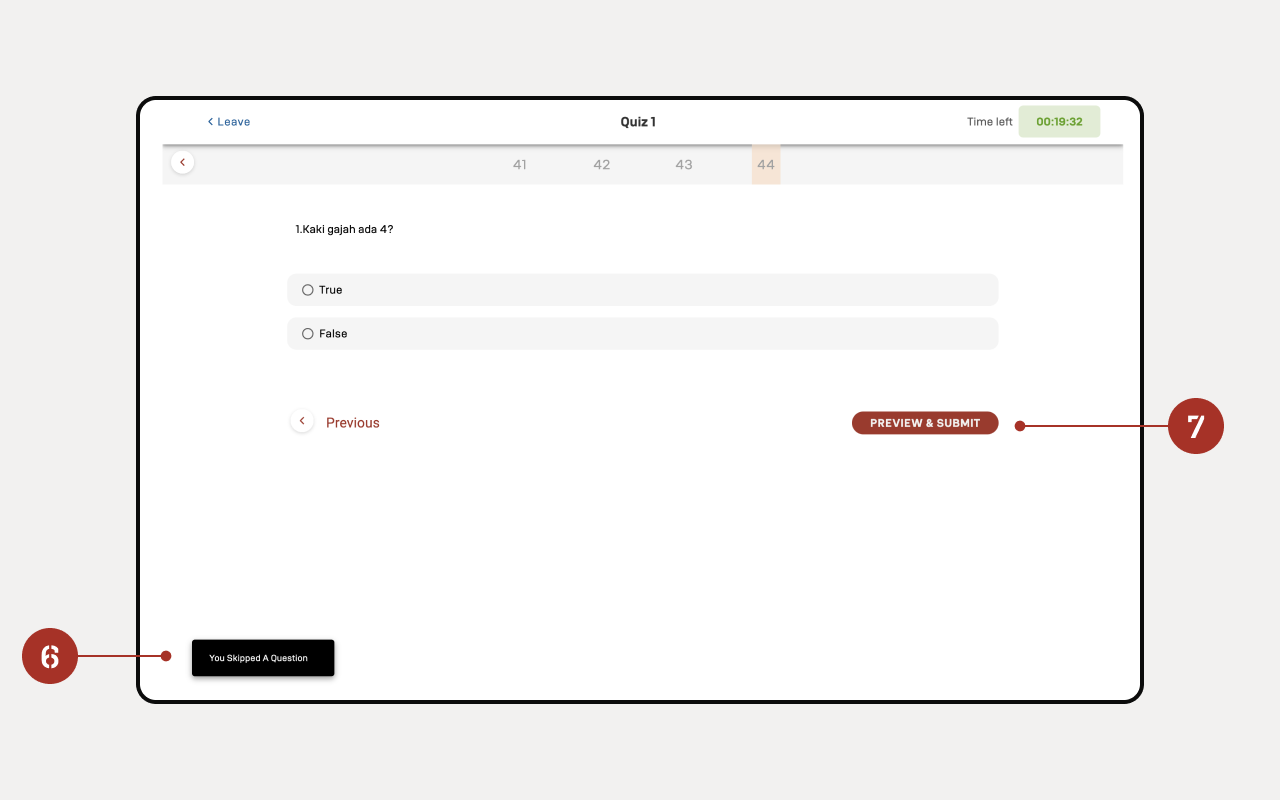
- There is a notification "You Skipped A Question" which indicates that there is a question that has not been filled in and is immediately skipped.
- There is a "Preview & Submit" button if you have finished working on the quiz.
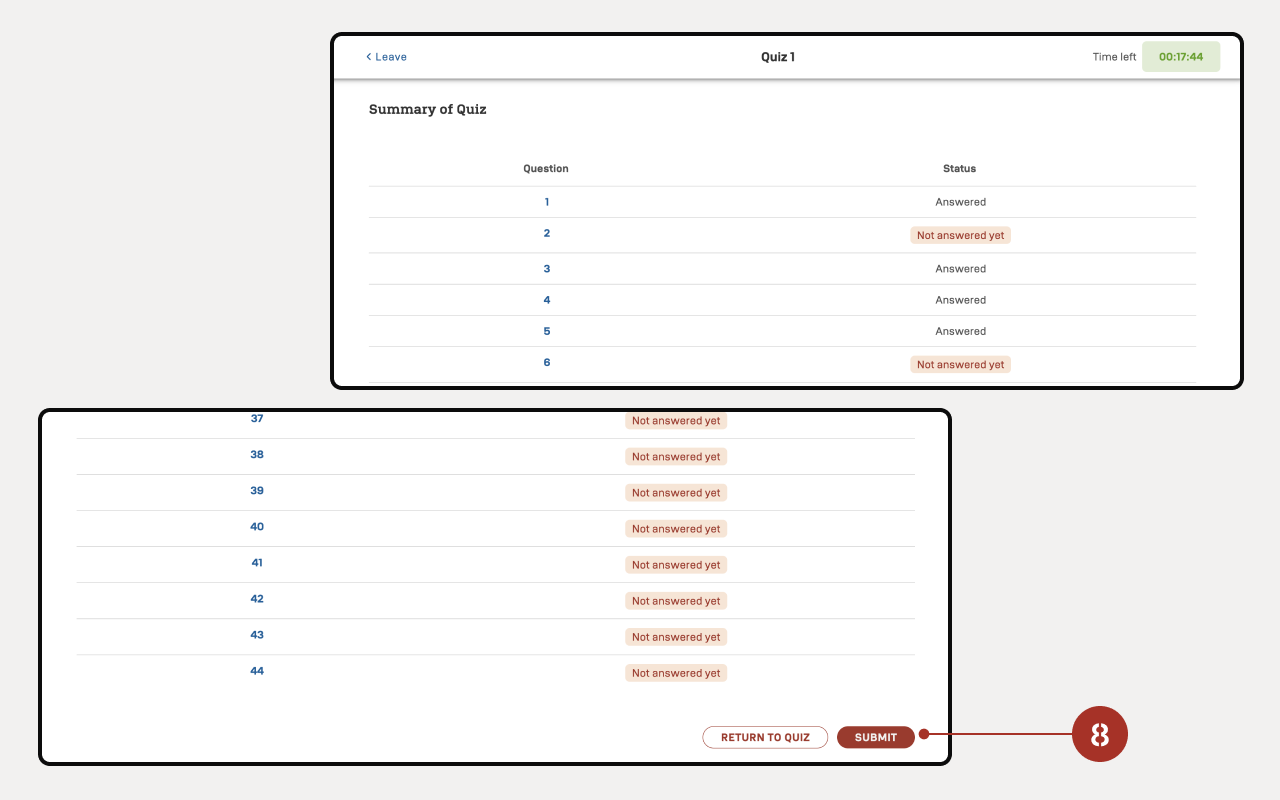
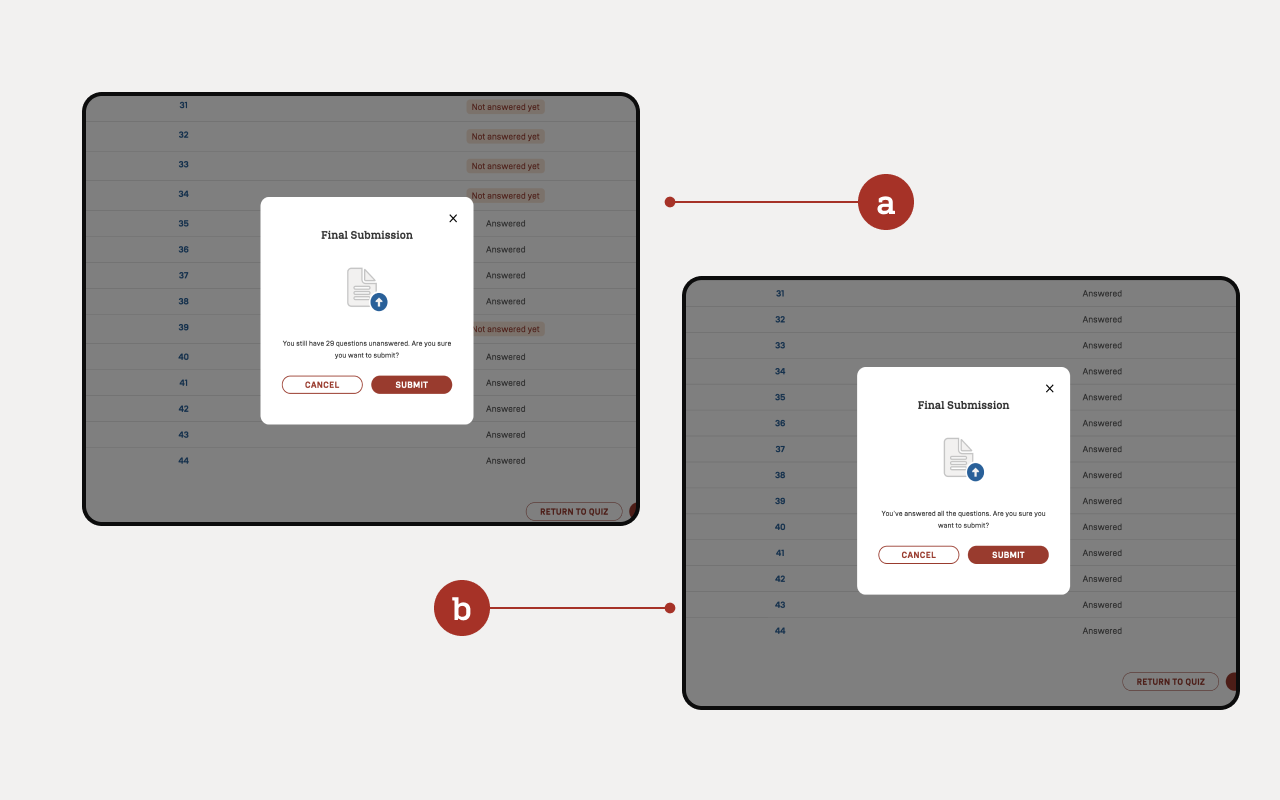
The image shows a Quiz Summary with a list of answered and unanswered questions.
- The "Submit" button finalizes the quiz, while "Return to Quiz" lets the user review or complete unanswered questions.
a. If there are still unfilled quizzes, the text "You still have 29 questions unanswered" will appear.
b. If all have been filled, the text "You've answered all the questions" will appear.
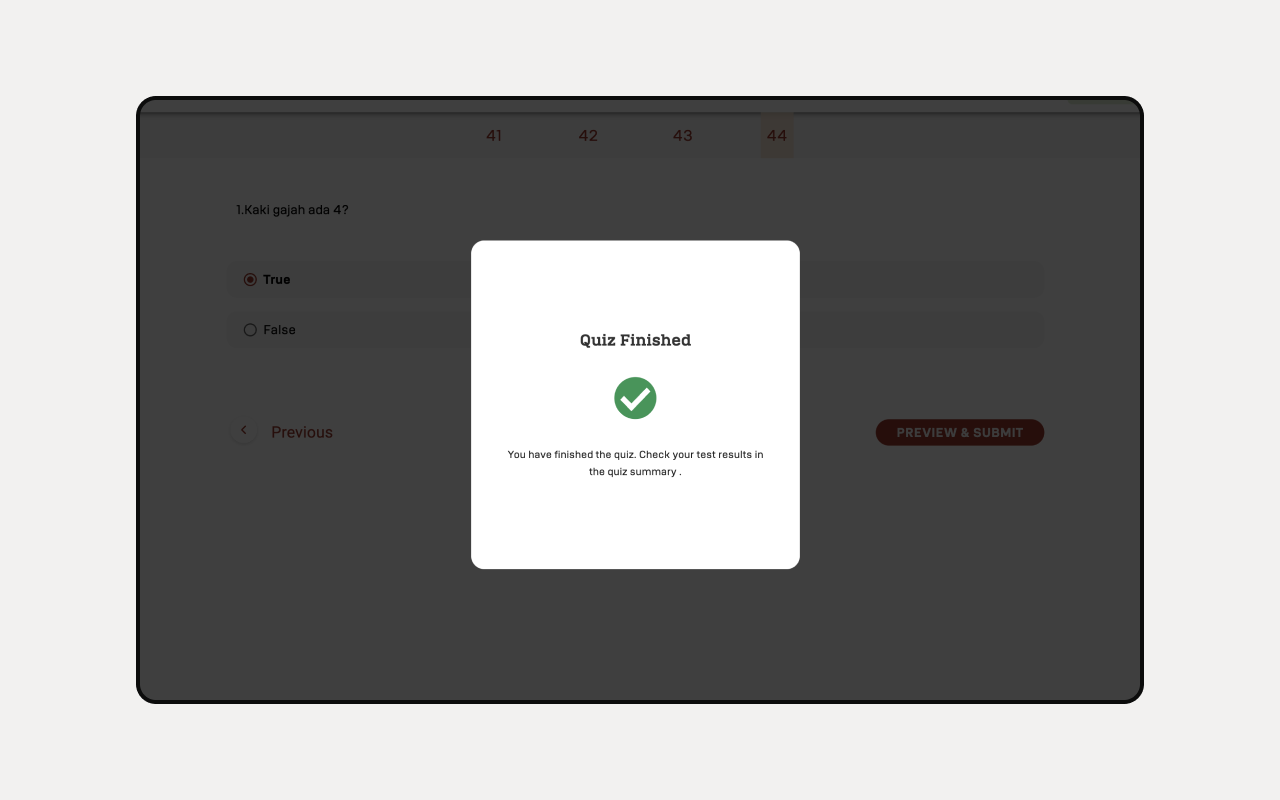
Click the "Submit" button if you want to collect the quiz.
After clicking "Submit", a quiz finished pop-up will appear explaining that all the quizzes have been completed and the quiz results can be checked.
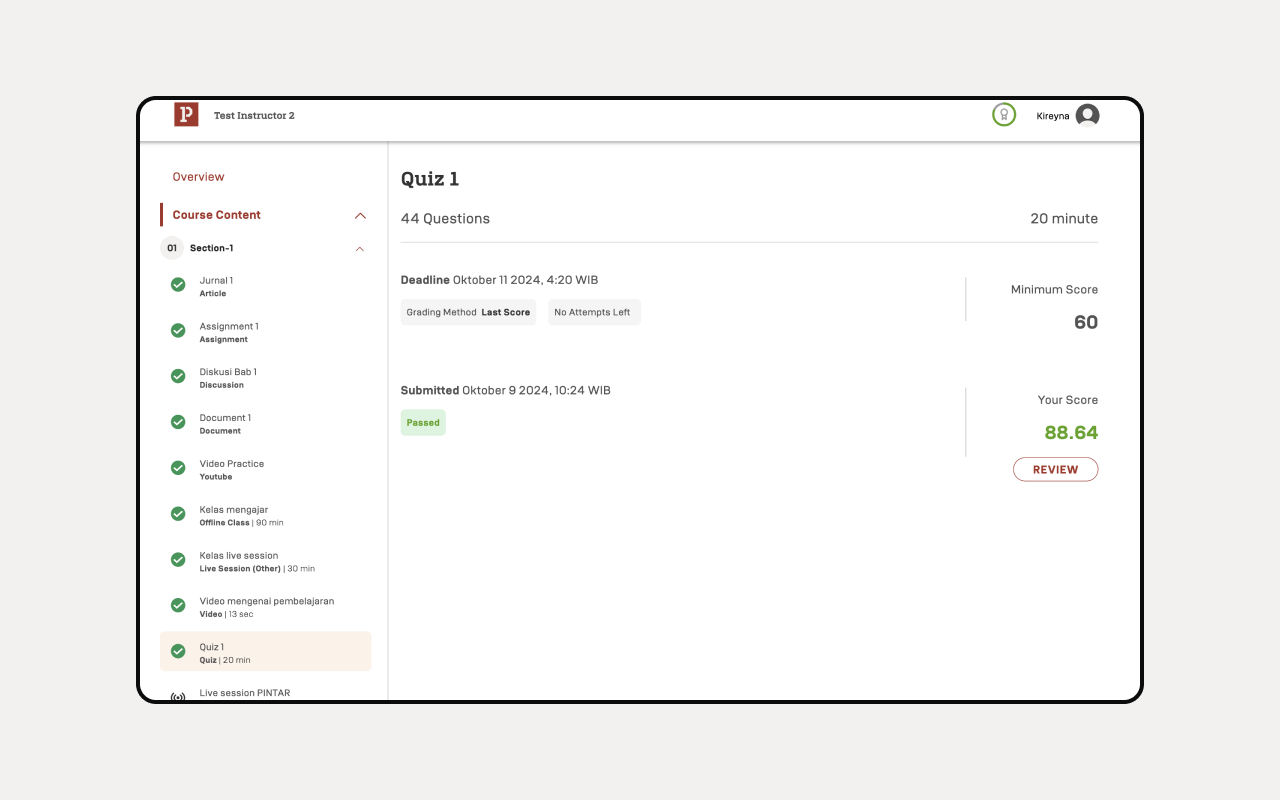
After completing the quiz, the quiz subcontent page will show the progress status.
- The status "Passed" means passing and the score obtained has exceeded the minimum score.
- The score obtained can be seen under "Your Score".
- Click "Review" to see previously completed quizzes.
The completed quiz page will show the status of each completed question.
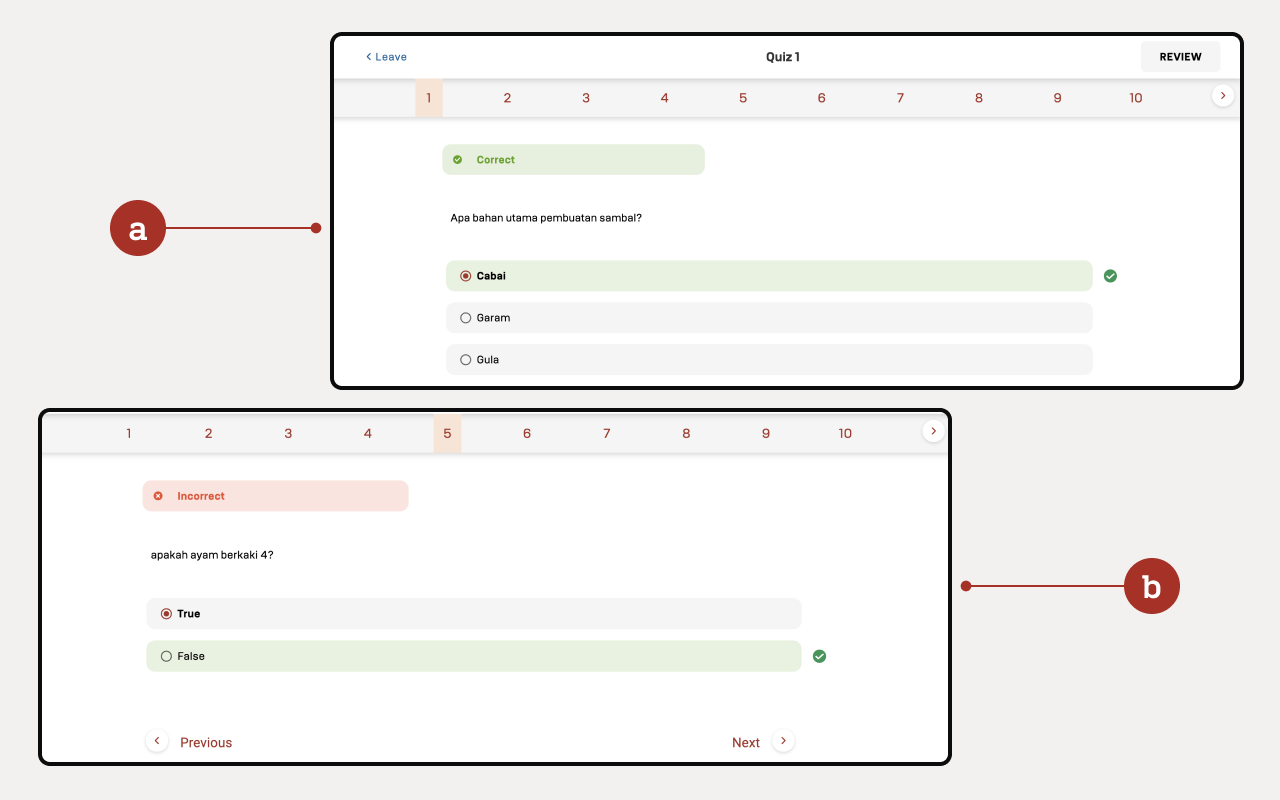
a. The "Correct" status at the top of the page means the answer is correct.
b. The "Incorrect" status means the question has the wrong answer. The answer option highlighted in green represents the right answer.
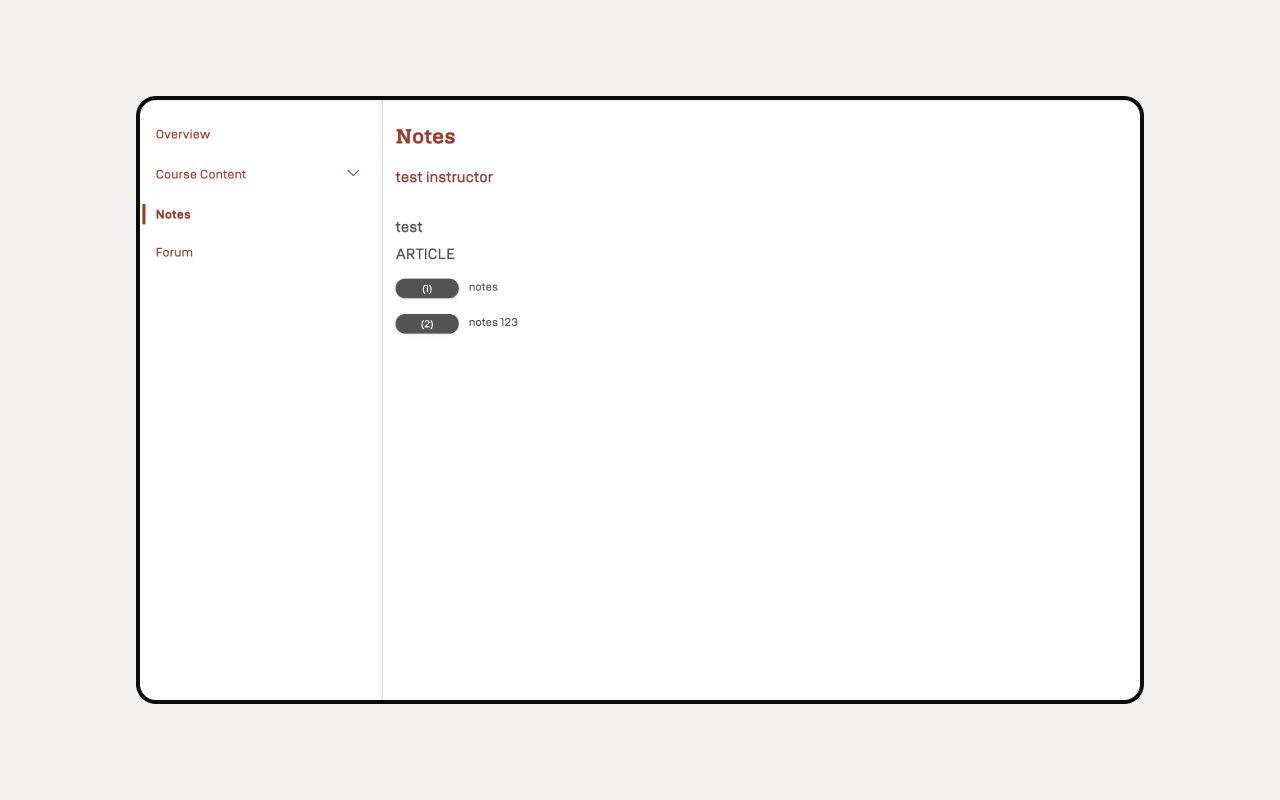
Understanding the Course (Notes)
Click "Notes" to view notes written during course study.
The "Notes" page will show notes taken throughout the course based on its course content, subcontent, and the minute/page that notes were written.
Understanding the Course (Forum)
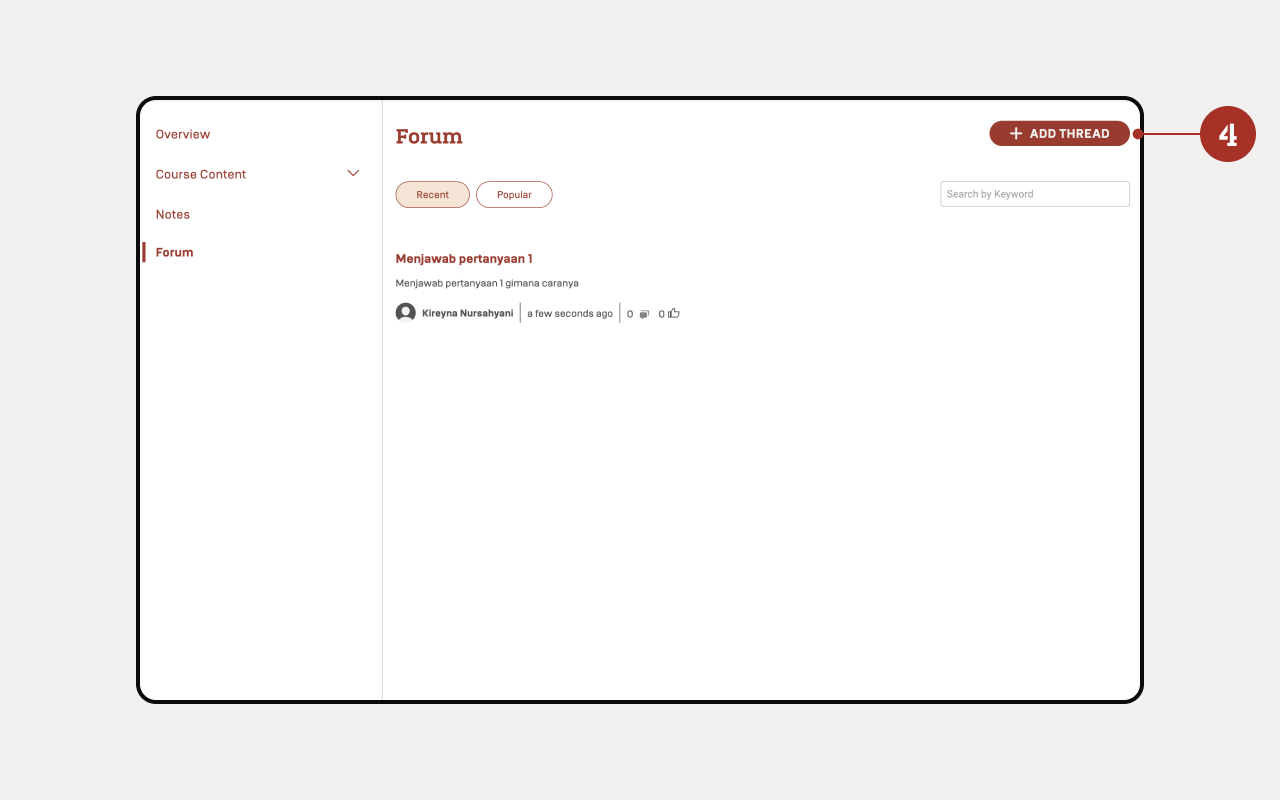
- Click "Forum" to access the forum page of the course you are taking.
- The "Forum" page will be divided into recent forums and popular forums.
- Click "Recent" or "Popular" to access one of them.
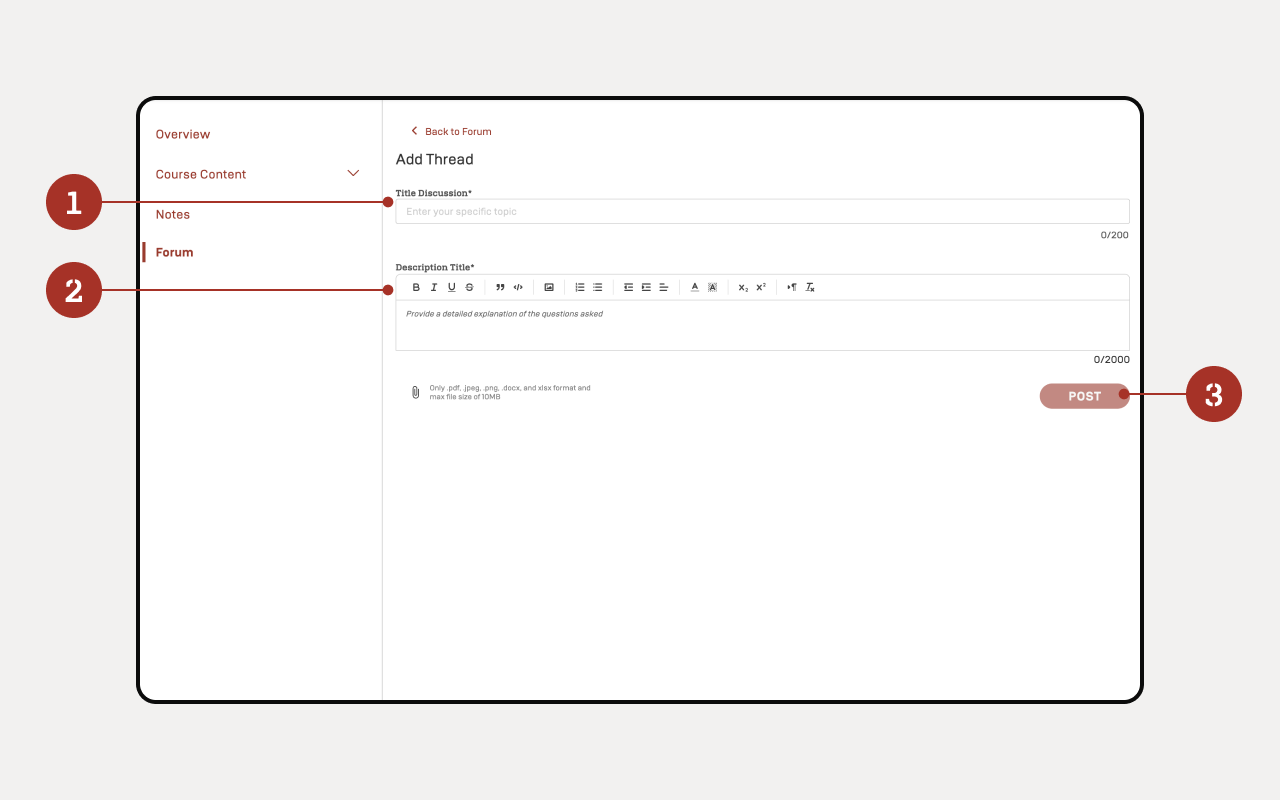
- Click "+ ADD THREAD" to add discussion to the forum.
- Type the discussion title in "Title Discussion".
- Type the contents of the discussion in the "Description Title".
- If the discussion you want to submit to the forum is satisfactory, click "POST".
Contacting Helpline
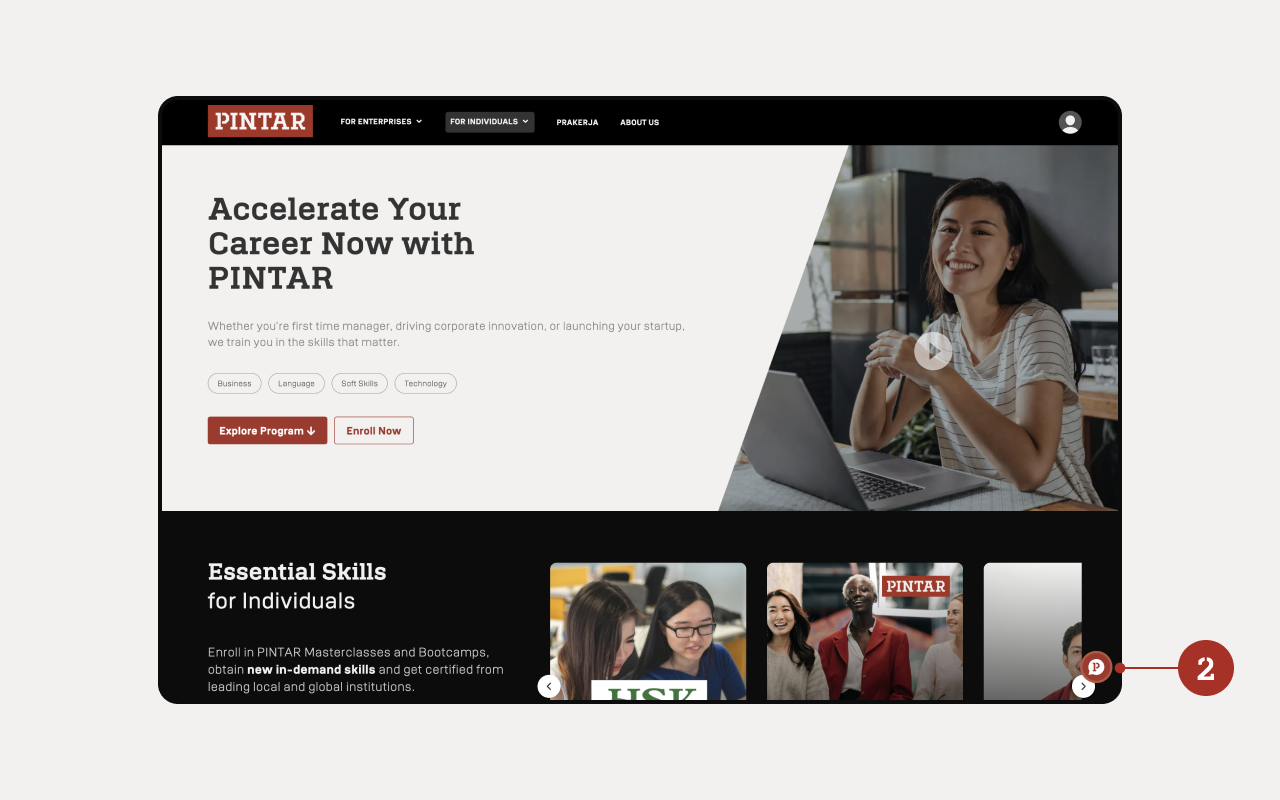
- go to URL (https://skills.pintar.co/)
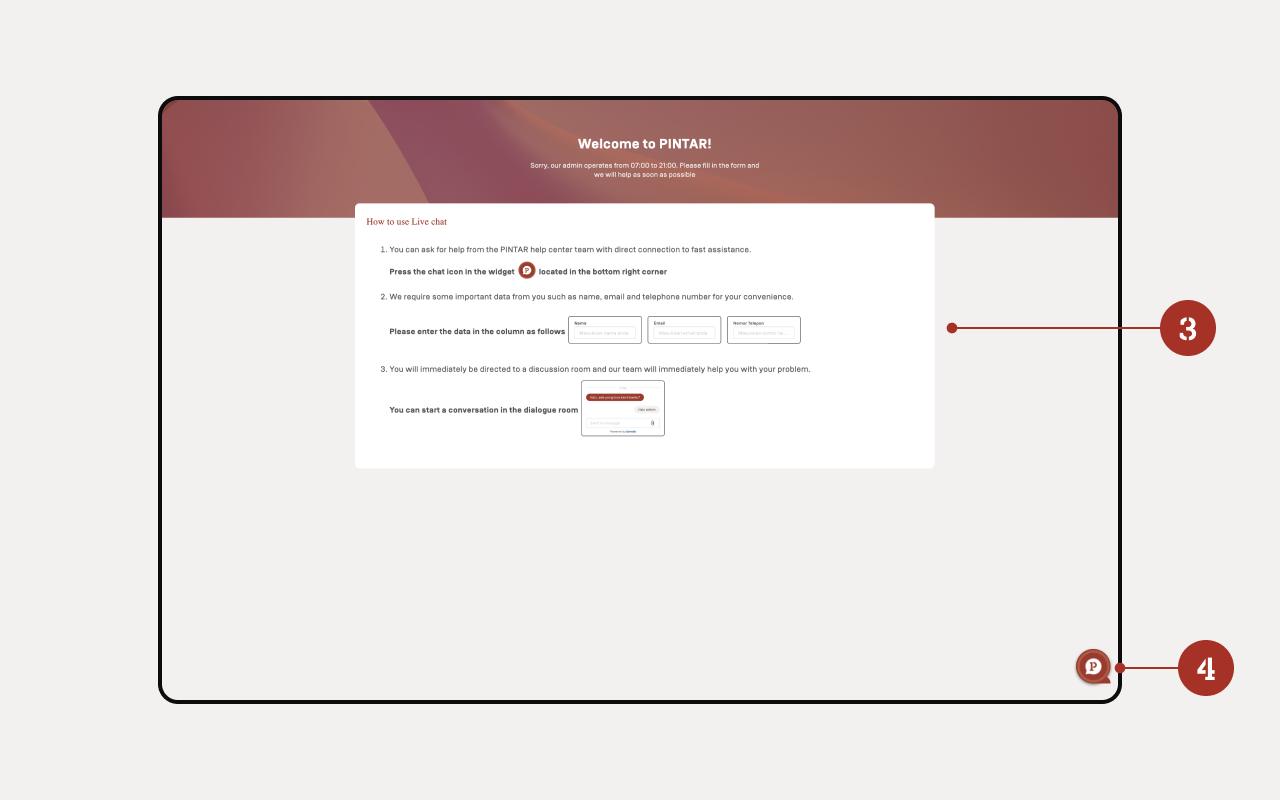
- Click the PINTAR's icon in the bottom right corner to contact customer service if you have problems accessing the course.
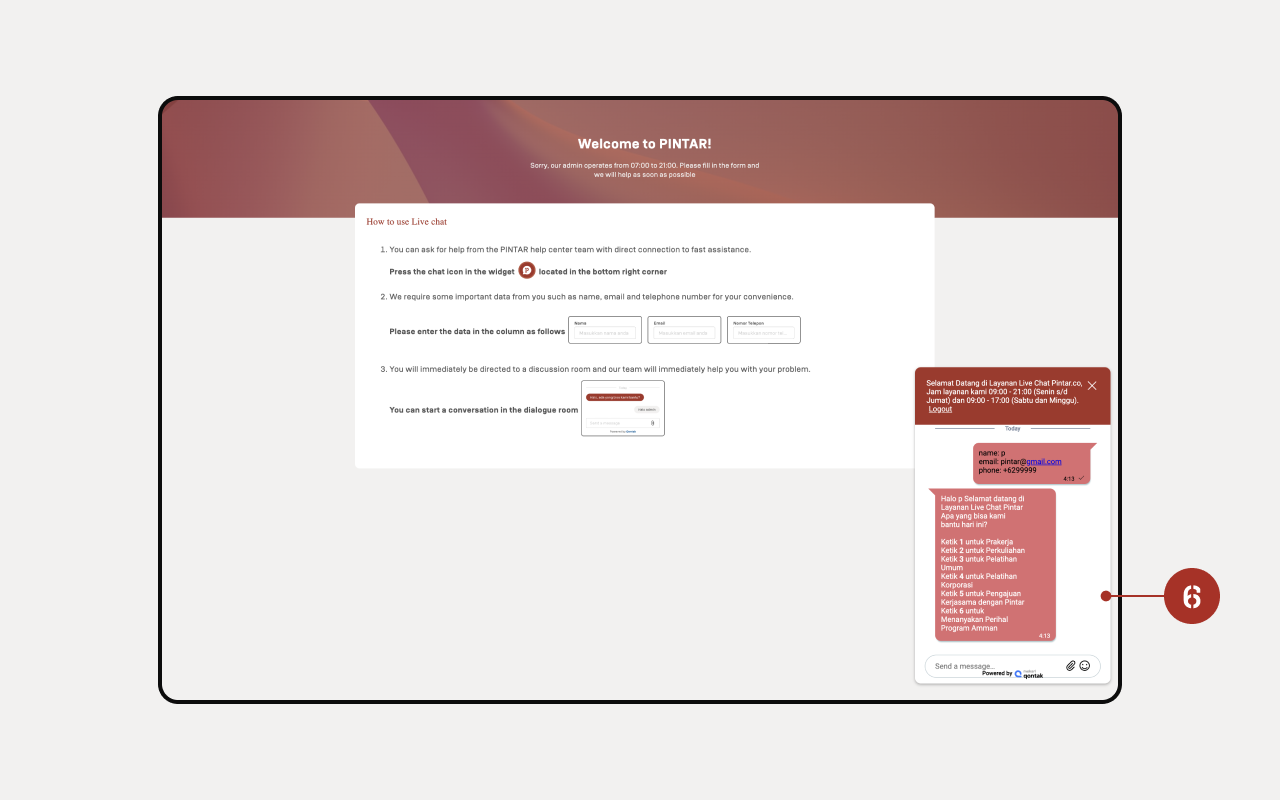
- There are procedures for using Live Chat.
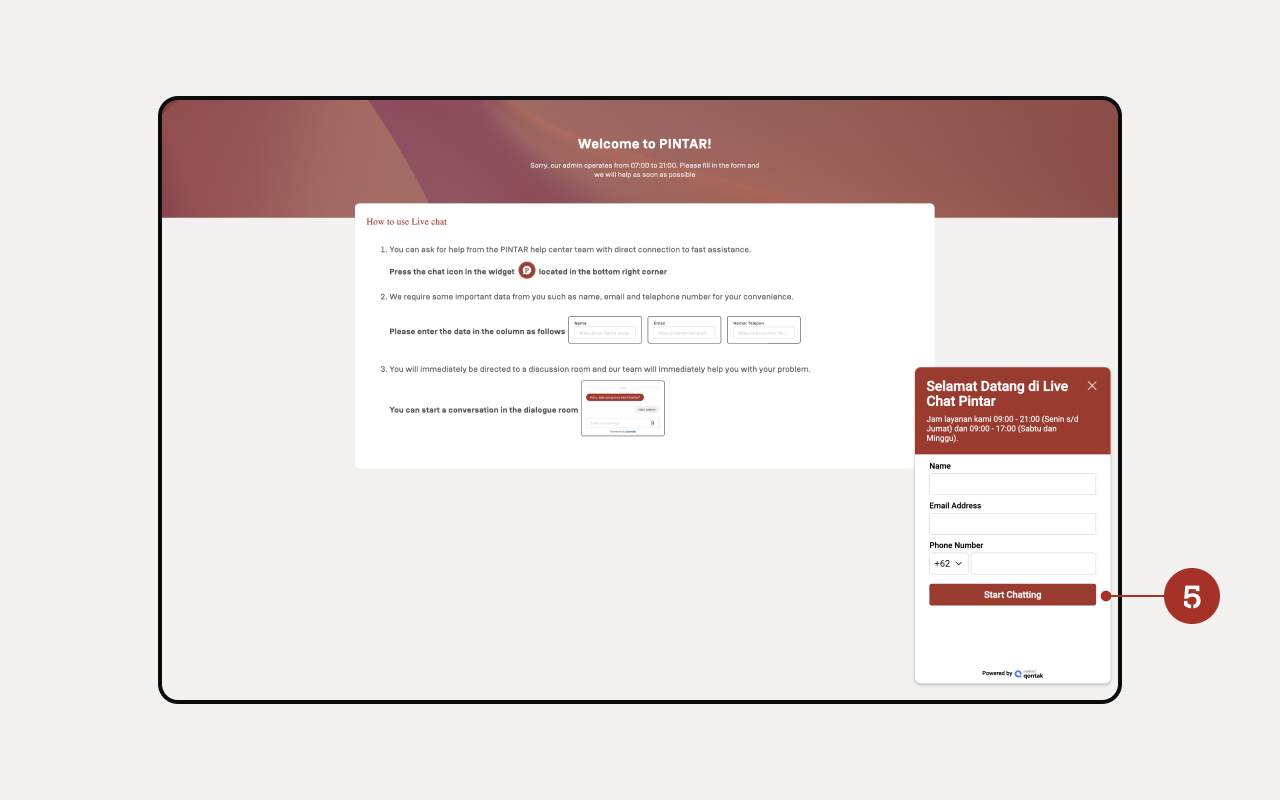
- Click the PINTAR's icon again to conduct a Live Chat session
- Enter personal data such as name, email, and phone number then click "Start Chatting"
- After that you will be directed straight to the chat room.
